Weld annotations in drawings
|
| You can use several types of weld annotations and symbols in a drawing. Default appearance of weld annotations is determined by the weld symbol style and can be edited in Style and Standard Editor. |
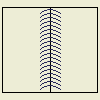
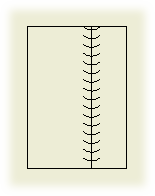
When you create drawing views of weldment assemblies, you can use the welding symbol from the model and automatically generate caterpillar annotations for solid body fillet welds.
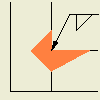
You can also manually add 2D welding symbols, caterpillars, and end fills to drawing views of any model.
Note: Model Weld Annotation and Model Weld Symbols use the Weld Bead and Weld Symbol styles.
Tip: See the information about calculation of weld joints in Engineer's Handbook.
Document weldment models
Weldments are a special type of assembly model that contains four states: preparations, welds, machining, and modeling. In a drawing, you can add views for any of the assembly states:
- Drawing views of the assembly state show the model without defined weld preparations or welds.
- Drawing views of the preparations state show the model with defined weld preparations.
- Drawing views of the welds state show the model with weld preparations and welds.
You can use the model welding symbols in the drawing. For solid body fillet welds, you can also use the model information to generate the caterpillars and end fills automatically.
- Views of the machining state show the model with weld preparations, welds, and post-weld machining features.
Note: Only the assembly state can be active when you create drawing views. If the weldment is "rolled back" to one of the other states, a message informs you.
Guidelines for using model weld annotations in drawings
Model weld annotations and symbols used in a drawing view are associated with the model and can update when the model changes. If you create a manual annotation or welding symbol in the drawing, and the model contains a welding symbol or annotation, the drawing welding symbol or annotation is a copy and does not update.
To create welding symbols and annotations that update when the model welding symbol and annotations change, right-click a drawing view and click Get Model Annotations, and then select Get Welding Symbols. Repeat and select Get Weld Annotations.
- The model in the drawing view must be a weldment assembly.
- To access the model weldment annotations in drawings, the assembly must be active in the weldment model, not a weldment state such as preparations, welds, or machining.
- Only solid body fillet welds generate caterpillars and end fills in the drawing. Cosmetic welds must be manually annotated.
- Model welding symbols appear in only one view on the sheet. You can drag them between views.
- You can change the format and display attributes of model weld annotations, but cannot edit the values from the drawing.
Add weld annotations to a drawing view
You can manually add welding symbols, caterpillars, and end fills to any edge in a drawing view.
- When you manually add a welding symbol associated to a weldment edge, the default values in the dialog box are the values of the model welding symbol. Values in manually added welding symbols do not automatically update.
- If you manually add a caterpillar or end fill to an edge of a solid weld feature, the display updates when the model changes.
To create welding symbols and annotations that update when the model welding symbol and annotations change, right-click a drawing view and click Get Model Annotations, and then select Get Welding Symbols. Repeat and select Get Weld Annotations.
Use model weld annotations in a drawing
|
| Welding symbols and annotations from a weldment model can be automatically added to a weldment drawing view when it is placed. When you use model weldment annotations, they are associated with the model and update when the model is changed. |
You can also add weldment annotations to an existing drawing view.
Tip: If a welding symbol or end fill was created in the model, manually adding a welding symbol or annotation in a drawing view creates a copy. It does not update if changes are made to the model welding symbol or end fill.
- To create a welding symbol that updates with the model welding symbol, right-click the drawing view and select Get Model Annotations
 Get Welding Symbols.
 - To create an end fill that updates with model end fills, right-click the drawing view and select Get Model Annotations
 Get Welding Annotations.
If there are no model welding symbols or end fills, you can make a non-associative welding symbol or end fill in the drawing view.
Add weldment annotations when creating a drawing view
When you place a drawing view of a weldment model, you can add welding symbols and annotations from the model. The assembly must be active in the weldment assembly to access its weld annotations. If necessary, on the Quick Access toolbar, click Return to exit the weldment environment.
|
|
|
Add model weldment annotations to a drawing view

You can add model welding symbols or annotations to an existing drawing view of a weldment.
- Select the view in the browser or graphics window.
- Right-click, and then select Get Model Annotations from the menu.
- Select either Weld Annotations or Welding Symbols.
Tip: If a welding symbol has been created in the model, manually adding a welding symbol creates a copy of the model welding symbol. It will not update if changes are made to the model welding symbol. To create a welding symbol that updates with the model welding symbol, right-click the drawing view and select Get Model Annotations Get Welding Symbols.
If there are no model welding symbols, you can make a non-associative welding symbol in the drawing view.
Add or edit weld annotations in a drawing view
|
| You can manually add weld annotations to a drawing view even if there are no weldments defined in the model. To change a weld annotation, you select the annotation and change values in the dialog box. |
The annotations (caterpillar, end fill, and welding symbol) are not associated to weldments in the model file and do not update if the model changes.
If welding symbols or end fills were created in the model, you can retrieve them in the drawing view. Welding symbols and end fills update with changes to the model.
Add or edit welding symbols
Use Welding to create a welding symbol with a leader line. The line type, line weight, color, and gap for the symbol are determined by the weld symbol style.
Tip: If a welding symbol has been created in the model, manually adding a welding symbol creates a copy of the model welding symbol. It does not update if changes are made to the model welding symbol. To create a welding symbol that updates with the model welding symbol, right-click the drawing view, and select Get Model Annotations Get Welding Symbols.
If there are no model welding symbols, you can make a nonassociative welding symbol in the drawing view.
|
|
|
To edit a nonassociative welding symbol, right-click a welding symbol, and select Edit Welding Symbol. In the Welding Symbol dialog box, change values as needed, and click OK. Welding symbols retrieved from the model must be edited in the weldment assembly.
Show Me how to create a welding symbol
Add or edit weld caterpillars
Use Caterpillar to add weld caterpillars to geometry in a drawing view. The caterpillar type, size, angle, and other formatting is determined by the weld bead style.
Tip: To create a caterpillar that updates with the model fillet bead, right-click the drawing view, and click Get Model Annotations Get Welding Annotations. If changes are made to the fillet bead in the model, the length of the caterpillar edge updates in the drawing view, but you must manually edit the caterpillar to change the leg length.
If there are no model caterpillars, you can make a nonassociative welding symbol in the drawing view.
|
|
|
Changing the caterpillar side - Once you have placed the arc legs of a caterpillar on the side of an edge, you can change the side on which they are placed. To do this, select the type for both sides in the Type area of the dialog box before you reselect the single side option. Once you have reselected the single side option, the caterpillar follows your cursor from one side to the other side as you move across the edge in the drawing view.
Changing the caterpillar from an entire edge to Start/Stop - Placing a caterpillar requires that you select an edge. If after selecting the edge you decide that the caterpillar should only display along a portion of the edge click Start/Stop on the Style tab of the dialog box and then select the start and stop points along the edge. The points that you select do not have to be geometric points - they can be approximate locations.
To edit, right-click a caterpillar, and select Edit Caterpillar. In the Weld Caterpillars dialog box, enter new values as needed, and click Apply. Click OK to close the dialog box.
Add or edit weld end fills
Use End Fill to add 2D end fill annotations to geometry in a drawing view. The size and other formatting is determined by the weld bead style.
Tip: To create end fills with model end fills, right-click the drawing view, and select Get Model Annotations Get Welding Annotations. If changes are made to the end fills in the model, end fill in the drawing update. If you customized the leg length of a preset type, you must manually edit the size.
If there are no model caterpillars, you can make a nonassociative welding symbol in the drawing view.
|
|
|
To edit an end fill, select the end fill on the drawing view, right-click and select Edit End Fill. On the End Fill dialog box, change values as needed. Click Apply to apply the changes and continue editing. When finished, click OK to close the dialog box.
Show Me how to create a preset shape end fill
Show Me how to create a custom shape end fill
Weld Caterpillars
|
| Manually adds a caterpillar annotation to geometry to a drawing view. The annotation is not associated with weldments in the weldment assembly. |
The default settings in the dialog box are determined by the weld bead style.
| Access: | Ribbon: Annotate tab  Symbols panel Symbols panel  Caterpillar Caterpillar |
Note: If the Caterpillar command is not visible, click the arrow next to the Welding or End Fill command, and then click Caterpillar.
Style tab
| Sets the display style for weld caterpillars. | |
| Edges | Selects the edges to which the caterpillar will be applied. Click the command, and then click to select the edges in the drawing view. |
| Start/Stop | Sets the beginning and end of the caterpillar if it does not extend the full length of the selected geometry. Click the command, and then click points on the select edges to indicate the start and stop points. |
| Direction | Reverses the direction of the caterpillar legs. |
| Type | Selects the Partial or Full caterpillar. When placing a partial caterpillar, click in the graphics window to set the side on which the legs are added. |
| Stitch | Creates an intermittent caterpillar. Select Stitch to add spaces to the caterpillar pattern. Clear the check box to create a caterpillar with all legs evenly spaced. |
Options tab
Sets the size for elements of the caterpillar.
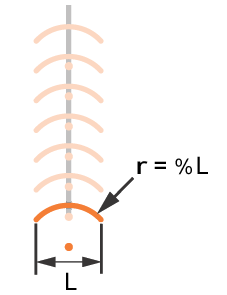
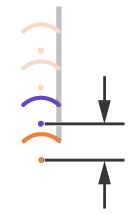
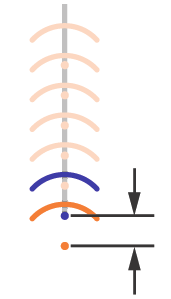
| Legs | Sets the size, angle, and format for the caterpillar legs. Width For a partial caterpillar, sets the distance between the endpoint of the leg and the selected edge. For a full caterpillar, sets the distance between the endpoints of the legs. Angle Sets the angle for an imaginary line between the selected edge and the endpoints of the legs. Arc % Sets the radius of the arc relative to the length of the arc chord. Spacing Sets the distance between legs in the caterpillar. Lineweight Sets thickness of the lines in the caterpillar. |
| Stitch Options | Sets the size for intermittent caterpillars. Length sets the length of one segment in an intermittent caterpillar. Offset sets the distance between the centers of two adjacent segments of an intermittent caterpillar. |
| Seam Visibility | Sets the visibility of the edge on which the weld caterpillar is placed. Select Seam Visibility to show the edge. Clear the check box to hide the edge after placing the caterpillar. |
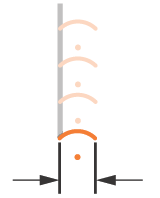
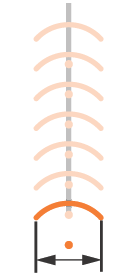
The following image shows leg width for a partial caterpillar.
The following image shows leg width for a full caterpillar.
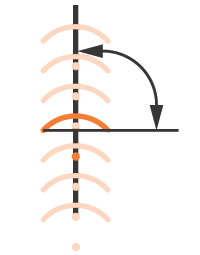
The following image shows leg angle for a partial caterpillar.
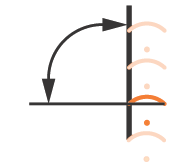
The following image shows leg angle for a full caterpillar.
The following image shows leg radius for a partial caterpillar.
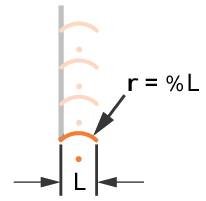
The following image shows leg radius for a full caterpillar.
The following image shows leg spacing for a partial caterpillar.
The following image shows leg spacing for a full caterpillar.
Weld End Fill
|
| Adds a weld end fill annotation in a drawing view or on a 3D weld bead to represent the hatched or filled region indicating the end of a weld bead. In a drawing view, the end fill can be recovered from the model. The default settings in the dialog box are determined by the active weld bead style. |
| Access: | Ribbon: Annotate tab  Symbols panel Symbols panel  End Fill End Fill |
Note: If the End Fill command is not visible, click the arrow next to the Welding or Caterpillar command, and then click End Fill.
In the weldment assembly, click Annotate tab  Symbols panel
  Welding , and clock the arrow next to the Welding command, and then click End Fill.
Type
| Sets the shape for weld end fills. Select a preset or custom shape. | ||
| Preset Shape | Click to select the appropriate shape. | |
|
| Fillet | |
|
| J-type | |
|
| V-type | |
|
| U-type | |
|
| Seam | |
| Custom Shape | Click to select a custom shape end fill. In the drawing view, click to specify the shape of the region to fill. | |
|
| Region | |
| Size | Controls the size of the selected preset shape. Accept the default size or enter new values. The selected option (legs or throat depth) is taken from the style as well. Available only when a preset shape is selected. Fillet shape sets width, height, or throat depth. J-Type, V-Type, and U-Type shapes set width and height. Seam shape sets the height. The width of the seam weld shape is defined by selection points when the shape is created. Tip: The default values can be edited in the Weld Bead style. | |
Options
| Sets the fill attributes for the selected end fill shape. | |
| Fill | Sets the format for the fill of the end fill annotation. Hatch selects a hatch pattern for the fill. Click the arrow, and then select from the available hatches. Not available if Solid Fill is checked. Solid Fill adds a solid fill to the end fill. Select Solid Fill to fill the end fill. Remove the check mark to use the selected hatch pattern to fill the end fill. Scale sets the scale for the selected hatch pattern. Click the arrow and select the scale. Not available if Solid Fill is checked. Color selects the display color for the hatch or solid fill. Click Color, and then select the color. |
Drawing Welding Symbol
|
| In a drawing view, specifies the content of a welding symbol placed on a selected weld edge. The dialog box opens when you place a welding symbol. Available options are determined by the weld symbol style and the associated drafting standard. |
If the model in the drawing view is a weldment that contains fillet welds, the dialog box displays the available data from the model.
Note: Once placed, a welding symbol does not update if the model changes. To add welding symbols that maintain association to the model, set the weldment options on the Options tab of the Create View dialog box when you place a view, or right-click the view, and select Get Model Annotations Get Welding Symbol.
| Access: | Ribbon: Annotate tab  Symbols panel Symbols panel  Welding Welding |
Sets the layout and content of the welding symbol. Symbols and values change, depending on the specified weld type and the active drafting standard. Choose the weld type and secondary fillet type, if applicable, and then specify the corresponding attributes.
| Identification Line | Click the arrow to select no identification line, identification line above, or identification line below the reference line. Available for ISO and DIN only. |
| Swap Arrow/ Other Symbols | Click to switch the arrow and symbols above or below the reference line. |
| Stagger | Staggers the welding symbols for fillets. Available only if fillet welding symbols are set on both sides of the reference line. |
| Tail note box | Adds description to the selected reference line. |
| ABC | Select check box to enclose note text in a box. |
| Prefix | Specifies a prefix to precede the symbol. |
| Leg | Specifies text for the leg. |
| Depth | Sets the weld depth. |
| Pitch | Specifies the distance between welds. |
| Contour | Specifies the contour finish for the weld. Click the arrow and choose Flush or flat finish, Convex finish, Concave finish, or Toes blended smooth (DIN only). |
| Secondary fillet type | Specifies the type of weld for secondary fillets.Available only when the active drafting standard is based on ANSI. |
| Angle | Specifies the angle between weldments. |
| Brazing | Specifies whether the weld is brazed. Select or clear the check box to add or remove the brazing symbol. |
| Clearance | Specifies the clearance for the braze. |
| Depth | Specifies the depth of the weld. |
| Diameter | Specifies the diameter of the weld. |
| Gap | Specifies the space between weldments. |
| Height | Specifies the height of the weld. |
| Length | Specifies the length of the weld. |
| Method | Specifies the finish method for the weld. Click the arrow and choose the method from the list. |
| Middle | Specifies the type of inspection to perform on the weld. |
| Number | Specifies the number of welds. |
| Root | Specifies the root thickness of the weld. |
| Root gap | Specifies the gap for the weld. |
| Size | Specifies the size of the weld. |
| Small leg | Specifies the thickness of the weld. |
| Spacing | Specifies the space between welds. |
| Thickness | Specifies the thickness of the weld. |
| Flag | Specifies whether to add a flag indicating a field or site weld to the selected reference line. |
| All-around symbol | Specifies whether to use an all-around symbol on the selected reference line. The diameter of the all-round character is specified in the leader style. |
| Symbol box | In Symbol, click Add to add a welding symbol to the current symbol. Click Delete to delete the current symbol. Click Previous or Next to activate the previous or next symbol.. All edits affect the current symbol only. |
