Functions
What are functions?
A function is an instruction carried out within a program. The instruction can include arguments or require certain inputs to run successfully.
Functions are typically arranged in a certain order to achieve a desired result. For example, one function retrieves a piece of information from a database, and the next function performs some operation on that data. Usually, each function is independent of the remaining code in a program.
Anatomy of a function
iLogic provides many functions for use in rules. Functions are grouped in categories.
The following is one example of how a function can appear in a rule:
returnValue = Category.FunctionName(argument1, argument2, ...)
An argument can be a text string, Boolean value of true or false, or number.
A text string value is specified inside a pair of double quotes.
"ComponentName:1"
and"Hole2"
are examples of text strings. Using our previous example, if the arguments are text strings, the function appears as:returnValue = Category.FunctionName("ComponentName:1","Hole2" )
An iLogic text parameter can be used as an argument to a function that expects a text string. An Inventor numeric parameter can be used as an argument to a function that expects a number.
A return value can be a text string, Boolean value of true or false, or number. It is often something that you want to read or retrieve from the model. You can test the return value, or assign it to a parameter or a local variable in the rule.
Some functions do not have a return value. In VB.NET, this type of function is called a Sub. It often changes the model. For example:
Category.FunctionName(argument1, argument2, ...)
Another type of function can be used to write or assign a value to something in the Inventor model. In VB.NET, this type of function is called a Property. For example:
Category.FunctionName(argument1, argument2, ...) = value
In this example, the function is writing the value to the model.
How do I use functions in iLogic?
iLogic provides functions to modify the Inventor model or read some data from the model and return it to you. These functions are available as code snippets in the Edit Rule dialog box. You place the functions in rules (small Visual Basic programs) that you define for the model. When a rule is run, the functions within that rule are executed.
Functions
Add a function to a rule
- If the rule is not already displayed, select it from the Rule Browser.
- In the rule text area of the Edit Rule dialog box, position the cursor where you want to insert the function. Most functions start on a new line.
- Locate the function in the Snippets area.
- Double-click the mouse button to add the function.
- If the function includes any arguments or requires any inputs, edit the inserted code as necessary.
Note: To add a function manually, type it in at the desired location. You can also copy a function already in the rule and then modify the copy.
Edit a function
You can edit a function within a rule using standard text editing techniques. Use the toolbar above the rule text area or the context menu for assistance with certain operations.
If you are adding a function, sometimes it is quicker and more efficient to edit a copy of a similar function that exists in the rule. Use Copy/Paste to create a copy of an existing function that can be edited.
Parameter functions
To access the Parameters functions, expand the Parameters node under the System tab in the Snippets area.
Parameter
Parameter("parameterName")
This function changes parameter values directly.
In assemblies, you can access parameters in suppressed components. However, if a component is suppressed, you cannot access its parameter directly with an assignment statement such as the following:
PartA.ipt.d12 = 6.3
Instead, you can use:
Parameter("PartA:1", "d12") = 6.3
Notice that a component name is specified instead of a file name. Although you give the function a specific component number, the parameter change affects all instances of the component. The component name is merely a way for the function to identify the file.
Rename the component manually to preserve its name if the component is replaced.
You can also use the
MakePath
function for the component name:Parameter(MakePath("SubAssem1:1", "Part1:1"), "d12") = 6.3
You can read the current value of a parameter using the syntax of one of the following statements:
param_val = Parameter("d0")
param_val = Parameter("PartA:1", "d0")
As shown in these examples, the parameter can be in the current document. You can use the name of any parameter that can be accessed from the rule.
In a component that is not suppressed, you can specify the filename instead of the component name: You can use this method to change a parameter in a base part that does not appear as a component in an assembly:
Parameter("PartA.ipt", "d12") = 6.3
If a parameter is not found, the
Parameter
function generates an error message. You can suppress the error message using the following:Parameter.Quiet = True
Use this technique if you know the parameter is missing and you are prepared for that condition.
Access parameters in base parts
You can access parameters in a base part from a derived part or assembly. You can also access them from an assembly that contains a part derived from the base part.
Sometimes, it is useful to drive parameters in the base part from rules in the assembly. This technique is referred to as top-down modeling. When you change a base parameter, the linked parameters in all derived parts also change.
The part and its parameters are not always visible in the Model tree within the Edit Rule dialog box. You can access them using the
Parameter
function. For example, to change a parameter in a base part, use:Parameter("BaseShaft.ipt", "Diameter") = 0.125 in
Usually, you do not have to read parameter values from the base part. The parameters are already linked into the part or assembly in which you are working.
Advanced Parameter functions
Use the
Parameter.Param
function to get direct access to an Inventor parameter. The object returned is of the type Parameter, from the Autodesk Inventor API:param = Parameter.Param("parameterName")
If (param IsNot Nothing) Then
param.Expression = "5.0 in"
param.Tolerance.SetToDeviation(0.002 * 2.54, -0.004 * 2.54)
param.Comment = "Equation and Tolerance set by a rule"
End If
Alternatively, you can use a single line:
Parameter.Param("foo").Comment = "Comment set by a rule"
You can access more properties of an Autodesk Inventor parameter using the following:
param = Parameter.Param("parameterName")
param = Parameter.Param("componentName", "parameterName")
These functions give you an object of the class
Inventor.Parameter
. See the Inventor Programming Help for more information on this class.MultiValue functions
Use MultiValue functions to access and change the list of values stored with a multi-value parameter. The following examples demonstrate their use:
MultiValue.SetList("d0", 0.5, 0.75, 1.0, 1.25)
Sets the list of available values for the parameter
d0
.MultiValue.SetList("d0", "3/8", "d1 * 2", "d1 * 3")
Sets equations instead of values. You can mix equations and values in the list.
MultiValue.SetList("filename.ipt.str0", "Value1", "Value2")
Sets a list of values for a text parameter in a part.
MultiValue.SetList("Part1:1", "d0", 0.5, 0.75, 1.0, 1.25)
Sets the list of values of a parameter in a component.
values = MultiValue.List("d0")
Gets the current list of values, where the variable
values
is an object of the VB.NET typeArrayList
.MultiValue.SetValueOptions(True, DefaultIndex := 0, NumericCompare := "=")
Forces the parameter to have a value which is in its multi-value list. If you then change the multi-value list, it also sets the current value of the parameter to one of the values in the list. This function does not change the value if it is found in the new list.
-
DefaultIndex := 0
If the current parameter value is not in the new list, the parameter is set to the first value (Index 0) in the list.
-
NumericCompare := "="
Tests for equality. You can also use
"<="
or">="
.
MultiValue.SetValueOptions(False)
When you change the multi-value list of the parameter, the actual value of the parameter does not change. This behavior is the default behavior of
MultiValue
.MultiValue.List("MyStringParam") = iProperties.Materials
Sets a text parameter to a list of values equivalent to the list of materials available in the current active standard.
MultiValue.List("d0") = New Double() {0.5, 0.75, 1.0, 1.25}
Uses an alternative method of setting the list of values.
Examples that use values from Microsoft Excel can be found in the section describing
GoExcel.CellValues
.MultiValue.UpdateAfterChange = True
Like setting
Parameter.UpdateAfterChange
to True, this statement updates the Inventor model immediately.MultiValue.Quiet = True
Suppresses the error message displayed when a parameter is not found. Use this function if you know the parameter is missing and you are prepared for that condition. For example, it is possible that the parameter does not exist in every part to which the rule applies.
foundVal = MultiValue.FindValue(aList, "<=", 4.0)
Finds the value in a list that most closely matches a condition.
aList
can be an ArrayList or Array. The argument for comparison can be"<="
,"="
, or">="
.The following example finds the value which is less than or equal to 4.0. If more than one value exists, the value closest to 4.0 is returned. If a matching value does not exist, this example returns the VB constant
"Nothing"
.foundVal = MultiValue.FindValue( MultiValue.List("d0"), "<=", 4.0)
You can test for this condition.
Feature functions
iLogic provides functions that set or read feature suppression states, colors, and thread designations.
Use the Feature functions for threads to set or read properties of thread features or tapped holes. These properties also appear in the editing dialog box for a thread feature or tapped hole.
To access the Feature functions, expand the Features node under the System tab in the Snippets area.
Feature.IsActive (with feature name)
Sets or reads the suppression state for a part or assembly feature. Use this function to suppress or unsuppress any feature of an Inventor part or assembly. When you change the activation state of a feature, you also change dependent features. This effect eliminates the need to specify dependent features in your rule.
Note: Manually changing the activation state of a feature does not cause rules referencing them to fire automatically. In a part, you can make such rules fire automatically by adding them to the list of rules triggered by the Feature Suppression Change event. This event is accessed with the Event Triggers command.
If you change the name of a feature after writing a rule that includes this function, edit the rule. Replace the old name with the new name. Change feature names (if necessary) before writing rules.
Feature names must always be enclosed in quotation marks.
Syntax
Feature.IsActive("featurename")
Example
if bracket_width >= 3 then
Feature.IsActive("flange_hole_pattern") = true
Feature.IsActive("base_hole_pattern") = true
else
Feature.IsActive("flange_hole_pattern") = false
end if
Feature.IsActive (with component and feature name)
This variation of the
Feature.IsActive
function sets or reads the suppression state of features in a part or subassembly by specifying the component and feature name. Use this syntax to control the activation state of features in parts from within a rule at the assembly level.Syntax
Feature.IsActive("componentname", "featurename")
Examples
Set the suppression state:
Feature.IsActive("PartA:1", "Hole:1") = false
Read the suppression state:
MyBooleanParameter = Feature.IsActive("PartA:1","Hole:1")
Feature.Color
Sets or reads the color of a part feature by specifying the feature name. This function does not work for assembly features.
The color value is a text string. The text must be enclosed in quotation marks. It must also match the exact spelling and case of the colors available in the active standard of the current Autodesk Inventor document.
Syntax
Feature.Color("featurename")
Examples
To set the color:
Feature.Color("Hole:1") = "Green"
Feature.Color("Hole:2") = "Aluminum (Cast)"
Feature.Color("Hole:3") = "As Material"
To read the color:
MyStringParameter = Feature.Color("Chamfer:1")
Set or read the color of subassembly or part features by specifying the component name and feature name:
Feature.Color("componentName", "featurename")
Feature.ThreadDesignation
Sets or reads the thread designation of a thread feature in a part or assembly document. The thread designation is a text string. It must be specified with the exact string as it appears in the Designation field of the threaded feature editing dialog box.
For a tapered thread, specify the value that would show up in the Size field of the Thread dialog box. This value is usually a shortened version of the full thread designation.
Syntax
Feature.ThreadDesignation("featurename") = "
Optionally, use the following syntax to show the current thread designation, in the format necessary to set it:
threadDes = Feature.ThreadDesignation("Thread1")
When you set the thread designation for a hole with a rule, the hole size adjusts automatically.
For a threaded rod, you can use a rule to change the rod diameter and the thread designation at the same time. The rod diameter must be compatible with the thread designation.
Example
If rod_type = "small" Then
Feature.ThreadDesignation("Thread1") = "3/8-16 UNC"
rod_diameter = 0.375
ElseIf rod_type = "large" Then
Feature.ThreadDesignation("Thread1") = "1/2-13 UNC"
rod_diameter = 0.500
End If
You can also set or read the thread designation of a thread feature in a part or assembly document from a rule at the assembly level. Specify the component or filename and the threaded feature name:
Feature.ThreadDesignation("PartA.ipt", "featurename") = "1/2-13UNC"
Feature.ThreadDesignation("PartA:1", "featurename") = "1/2-13UNC"
Feature.SetThread
Makes major changes to a hole or threaded feature. Sets the type, designation, and class. Use this function to switch between inch and metric threads. You cannot switch between a straight and a tapered thread.
Note: For a tapered thread, substitute an empty string ("") for the thread class. Also, use the Size instead of the Designation.
Syntax
Feature.SetThread("featurename", "thread type", "thread designation", "thread class")
Alternatively, use the following syntax to make major changes to a hole or threaded feature in a component:
Feature.SetThread("componentName", "featurename", "thread type", "thread designation", "thread class")
Feature.ThreadType
Get the thread type of a hole or threaded feature. Examples include "ANSI Unified Screw Threads", "ANSI Metric M Profile", and so on. To change the type, use
SetThread
, and set the designation and class at the same time.Syntax
currentType = Feature.ThreadType("featurename")
Alternatively, use this syntax to get the thread type of a hole or threaded feature in a component:
currentType = Feature.ThreadType("componentName", "featurename")
Feature.ThreadClass
Set the thread class of a hole or threaded feature. The greater the number, the higher the degree of accuracy.
Syntax
Feature.ThreadClass("featurename") = "3B"
Use this syntax to get the thread class of a hole or threaded feature:
currentClass = Feature.ThreadClass("featurename")
Use this syntax to set the thread class of a hole or threaded feature in a component:
Feature.ThreadClass("componentName", "featurename") = "3B"
Note: Does not apply to a tapered thread.
Get the thread class of a hole or threaded feature in a component.
currentClass = Feature.ThreadClass("componentName", "featurename")
Component functions
iLogic provides rule functions for setting or reading component suppression states and colors, as well as a function for replacing one component with another. These functions are useful for driving different configurations of parts or assemblies.
You can create a model (part or assembly) that includes the components necessary to represent all possible valid configurations of a product. This method is known as "super modeling." When the parts or assembly components are too complex or numerous, and super modeling becomes impractical, use the
Component.Replace
function.To access the Component functions, expand the Components node under the System tab in the Snippets area.
Component naming
Customize all component names before referencing the names in a rule. When you change the component name from the default name assigned by Autodesk Inventor, you ensure that it does not change when the referenced .ipt or .iam file changes.
You can change the component back to its original name and still preserve its stability. To change the component, make a minor change to the name, and then change it back to the original.
For a Content Center component, a name change is required for the
Component.IsActive
function as well as theComponent.Replace
function.Component.IsActive
Sets or reads the suppression state and BOM structure of an assembly component. Use this function to include or exclude a component from an assembly configuration.
The function works on a single component or on component patterns. For patterns, use the pattern name. The pattern must be in the same level of the assembly as the rule and not in a subassembly.
Do not suppress subcomponents. A better alternative is to perform the suppression from a rule inside the component.
For example, an assembly named TopAssembly contains SubAssembly:1, and this subassembly contains SamplePart:1.
Use a rule inside SubAssembly to suppress SamplePart:1. This rule can have a parameter that drives the suppression state, and you can drive the parameter with a rule in TopAssembly.
When you use iLogic to suppress a component, the BOM Structure of the component is set to Reference. This action prevents it from appearing in the Bill of Material. It appears in the Model Data view, but not in the Structured or Parts Only views. If the component is unsuppressed, iLogic returns the component to its state before suppression (Normal, Inseparable, Purchased, or Phantom).
Before you use an iLogic rule to change the suppression state of an assembly component, create and activate a new custom Level of Detail.
Syntax
Component.IsActive("ComponentName")
Examples
You can use
1
instead oftrue
and0
instead offalse
.To set suppression state and BOM structure:
Component.IsActive("PartA:1") = false
Component.IsActive("PartB:1") = 0
Component.IsActive("PartC:1") = false
Component.IsActive("PartD:1") = 0
To read suppression state and BOM structure:
MyBooleanParam = Component.IsActive("ComponentName:1)
If Component.IsActive("PartE") Then
' do something
End If
Component.iComponentIsActive
A variation of Component.IsActive, this function sets or reads the suppression state of an iPart or iAssembly component. If you do not manually change the component name, then iParts and iAssemblies require the use of this dedicated syntax.
It is recommended that you change the component name. If you do, you can then use
Component.IsActive
instead of this function.Syntax
Component.iComponentIsActive("iPartParentName:1")
iPartParentName
The name of the factory part without the .ipt filename extension.
Component.Color
Sets or reads the color of a component.
Syntax
Component.Color("iPartA:1")
Examples
Set the color:
Component.Color("iPartA:1") = "Green"
Component.Color("iPartA:2") = "Aluminum (Cast)"
Component.Color("iPartA:3") = "As Material"
Read the color:
MyStringParameter = Component.Color("iPartA:1")
Component.Visible
Sets or reads the visibility of a component. This function does not change the BOM Structure of the component.
Syntax
Component.Visible("componentName")
Examples
Set visibility:
Component.Visible("Plate") = true
Component.Visible("Bearing") = false
Read visibility:
parameter = Component.Visible("Plate")
parameter = Component.Visible("Bearing")
If Component.Visible("PartE") Then
do something
End If
Component.SkipDocumentSave
Specifies whether a component document is saved if it changes and is then suppressed by a rule.
Syntax
Component.SkipDocumentSave = True
When set to
True
, the component document is not saved.The default value is
False
(Component.SkipDocumentSave = False
); the component document is saved.Component.Replace
Replaces one part or subassembly with another. This function can also be used to replace component patterns.
Use iMates in components being swapped to keep the assembly constraints intact. You can swap a part for a part, a part for an assembly, or an assembly for a part.
The function searches in several directories (folders) for the file to be used as a replacement:
- The directory of the document of the component being replaced
- The directory of the assembly document
- The Workspace folder of the current project
The filename can be a relative path (relative to any of these search locations).
Note: Before using this function, "stabilize" the name of the component to prevent it from changing when the swap occurs. To stabilize the component name, change it to something else. You can even stabilize the name by changing it once and then changing it back to the original name. If you fail to stabilize the name, the replace operation changes the component to match the different name. The rule is then unable to find the component when it runs again.
Syntax
Component.Replace("ComponentToReplaceName", "OtherPartfilename.ipt",
ComponentToReplaceName
The name of the part or subassembly being replaced.
OtherPartfilename
The part or assembly to be used as the replacement.
Set this Boolean value to
True
to replace all instances of this component. Set the value toFalse
to replace only the single named instance.Example
If PartType = "Type A" Then
Component.Replace("Widget","PartA.ipt", True)
ElseIf PartType = "Type B" Then
Component.Replace("Widget","PartB.ipt", True)
End If
Component.Replace (with specified level of detail)
This variation of the
Component.Replace
function replaces a component in an assembly with another component at a specific level of detail.Syntax
Component.Replace("SubAssem:1", "OtherAssemFilename.iam
In this function, the
Component.Replace
function.You can also replace a subassembly with the same subassembly at a different level of detail.
Component.ReplaceiPart
Required for iParts with custom parameters, this function is also recommended for standard iParts. Use instead of
Component.Replace
when the component is an iPart. You can useiPart.ChangeRow
oriPart.FindRow
after replacement to change the specific iPart configuration.For an iPart with custom parameters, list values for the custom parameters after the rowNumber. The values must be listed in the order they are found in the table.
Syntax
Component.ReplaceiPart("iPart1:1", "OtherPartfilename.ipt", True, rowNumber)
Use
rowNumber
to replace the component and choose an iPart row at the same time.Examples
To set the custom parameters, repeat the custom values in
Component.ReplaceiPart
and again iniPart.ChangeRow
oriPart.FindRow
later in the rule.For
ChangeRow
:Component.ReplaceiPart("iPart1:1", "OtherPartfilename.ipt", True, rowNumber, customParam1, customParam2)
iPart.ChangeRow("iPart1:1", rowNumber, customParam1, customParam2)
For
FindRow
:Component.ReplaceiPart("iPart1:1", "OtherPartfilename.ipt", True, rowNumber, customParam1, customParam2)
i = iPart.FindRow("iPart1:1", "Dia", ">=", 3.0, "r;|", customParam1, customParam2)
MakePath
Defines the path to a component name in a subassembly. To specify the path, list all subassembly levels in the order they appear in the tree. This function is required if you want to specify a component name when the same name also exists elsewhere in the assembly.
Syntax
MakePath("SubassemblyComponentName","PartComponentName")
Examples
Component.Color(MakePath("SubAssem1:1", "Part2:1")) = "Green"
Component.IsActive(MakePath("SubAssem1:1", "SubSubAssem2:1", "Part2:1")) = "Yellow"
iProperties functions
iLogic provides rule functions for setting or getting the iProperties of Inventor part, assembly, and drawing documents. As rules are used to morph or modify designs into new configurations, keep the iProperties of the design documents updated. iProperties must be up to date for the Bill of Material to be correct. Rules can also be used to read the iProperty values of a document and react to them. For example, you can have a rule that changes the thickness of a part when the material property is changed. A rule can cause changes if the mass of the part exceeds a maximum or minimum. Any iProperty that can be set manually can be set or read using a rule.
To access the iProperties functions, expand the iProperties node under the System tab in the Snippets area.
iProperties.Value
Syntax
iProperties.Value("property tab name", "property name")
Reads or sets a property value in the document that contains the rule.
iProperties.Value("filename.ipt", "property tab name", "property name")
Used in an assembly level rule to access the iProperties of a part or subassembly.
If the file name of the part or subassembly is changed, the rule text must also be changed.
It is best to use the component name (after customizing it) rather than the file name.
iProperties.Value("custom component name", "property tab name", "property name")
Sets or reads the property values in a component. This function uses the component name rather than the file name. Customize the component name (change it from its original default name) so that it does not change if the file reference changes.
Examples
Set the iProperty value:
iProperties.Value("Project", "Stock Number") = "302A"
Read the iProperty value:
MyStringParam = iProperties.Value("Project", "Stock Number")
Set custom iProperty value:
iProperties.Value("Custom", "Age") = 41 'number type
iProperties.Value("Custom", "Company") = "Autodesk, Inc" 'text type
iProperties.Value("Custom", "Date") = CDate("11/1/2008") ' date type
iProperties.Value("Custom", "Insured") = true 'yes or no type
Read custom iProperty value:
age = iProperties.Value("Custom", "Age")
company = iProperties.Value("Custom", "Company")
thedate = CStr(iProperties.Value("Custom", "Date"))
insured = iProperties.Value("Custom", "Insured")
Things to remember
- Most properties are text strings.
- Properties that include
date
in their name are dates. In rules, these properties can be read into and set by local variables of the VB.NET typeDate
. Often, you do not have to be aware of the property types because VB.NET automatically converts the value. - The
Estimated Cost
property (under Project) is a number. - The
Design State
property (under Status) is a special case. Use a number, even though it shows up in the iProperties editor as a list of choices. The following example uses temporary variables.Work_In_Progress = 1
Pending = 2
Released = 3
iProperties.Value("Status", "Design State") = Pending
Deprecated functions
Previous iLogic versions used the following functions to get the iProperties from parts in assemblies:
iProperties.ValueInDoc("filename.ipt", "property tab name", "property name")
References the file name.
iProperties.ValueInComponent("custom component name", "property tab name", "property name")
References the component name.
Although these functions are not available in the Snippets area of the Edit Rule dialog box, they work if used in a rule. However, the
iProperties.Value
function is preferred instead of these older functions.iProperties.StylesInEnglish
This function supports the use of the same document in different language versions of Autodesk Inventor. Your model is more portable when you use English names for materials and colors in your rules. If you set this function to
True
, then any function that returns any material or color names returns the names in English. You can use names in the language of your Autodesk Inventor installation to set a material or color name. But it is recommended that you use English names for consistency. The following functions return names in English when you set theiProperties.StylesInEnglish
value toTrue
:-
iProperties.Material
-
iProperties.MaterialOfComponent
-
iProperties.Materials
-
iProperties.PartColor
-
Feature.Color
-
Component.Color
iProperties.Material
Sets or reads the material of a document.
When setting the material, use the exact material name (case sensitive) as it appears in the active standard physical materials list. Material values are always text strings, enclosed within quotation marks.
Examples
To set the material:
iProperties.Material = "Gold"
To read the material:
MyStringParam = iProperties.Material
iProperties.Material("filename.ipt")
Sets or reads the material of a part within an assembly, by specifying the filename.
iProperties.Material("componentName:1")
Used in an assembly level rule to access the material of a part in the assembly, by specifying the component name.
iProperties.PartColor
Sets or reads the current color of a part. Part Color values are text strings enclosed in quotation marks. Changing the color does not affect the current material value.
This function works for parts only.
Examples
To set the color:
iProperties.PartColor = "Green"
iProperties.PartColor = "As Material"
To read the color:
MyStringParam = iProperties.PartColor
iProperties.Mass
Reads or writes the mass of the part or assembly document containing the rule.
If you write to the mass, it overrides the calculated mass. To restore the calculated value, set the mass to -1.
iProperties.Mass("filename.ipt")
Reads or writes the mass of a part or subassembly in an assembly, by specifying the filename.
iProperties.Mass("component name:1")
Reads or writes the mass of a component in an assembly, by specifying the component name. This function can also be used to read or write to the mass of a virtual component.
Examples
To read the mass:
MyMassParam = iProperties.Mass
MyMassParam = iProperties.Mass("component:1")
MyMassParam = iProperties.Mass("mypart.ipt")
To set the mass (override automatic calculation):
iProperties.Mass = 3 kg
iProperties.Mass("virtual_component") = 233 g
iProperties.Mass("mypart.ipt") = 4.2 lbmass
iProperties.Mass = -1 'set the mass back to automatic calculation
iProperties.Volume
Reads or writes the volume of the document containing the rule.
iProperties.Volume("filename.ipt")
Reads or writes the volume of the part or subassembly containing the rule, by specifying the filename.
iProperties.Volume("component:1")
Reads or writes the volume of a component in an assembly, by specifying the component name. This function can also be used to read or write to the volume of a virtual component.
Examples
To read the volume:
MyVolumeParam = iProperties.Volume
MyVolumeParam = iProperties.Volume("component:1")
MyVolumeParam = iProperties.Volume("mypart.ipt")
To set the volume (override automatic calculation):
iProperties.Volume = 12.4 in^3
iProperties.Volume("virtual_component") = 542 cm^3
iProperties.Volume("mypart.ipt") = 12.8 in^3
iProperties.Volume = -1 'set it back to automatic calculation
iProperties.CenterOfGravity
Reads the center of gravity of the model in the document containing the rule.
Syntax
pt = iProperties.CenterOfGravity
pt
is of the type Inventor.Point, which is described in the Help for Inventor API. You can read the X, Y, and Z values of the point, expressed in the units of the rule document:cx = pt.X
cy = pt.Y
cz = pt.Z
pt = iProperties.CenterOfGravity("component")
Reads the center of gravity of a component in an assembly, specifying the component name.
iProperties.Area
Reads the surface area of the model in the document containing the rule.
Syntax
surfaceArea = iProperties.Area
surfaceArea = iProperties.Area("component:1")
Reads the surface area of a component in an assembly, by specifying the component name.
Excel Data Links functions
iLogic provides rule functions for reading and writing to Microsoft Excel spreadsheet documents. To access the Excel Data Link functions, expand the Excel Data Links node under the System tab in the Snippets area.
Two types of Excel Data Links functions are available:
- Functions to read data from tables
- Functions to read and write data from a specific cell
To read and write to other file formats, add custom VB.NET code to your rules.
Use the dedicated function
ThisBOM.Export
to export an assembly Bill of Material to Microsoft Excel and other formats.Specify the Excel file
You can embed Microsoft Excel data or link it into an Autodesk Inventor document, or keep it as an external file. The functions require either a filename or a specification of a linked or embedded Excel file.
For a filename, you can specify a relative or absolute path. However, using absolute paths can make it difficult to send the model to another user on a different computer. If a path is not specified, iLogic assumes that the Excel document is in the same folder as the current Inventor document. A relative path is interpreted as relative to the folder containing the Inventor document.
iLogic also searches for the file under the project Workspace path. You can use a relative path under the project Workspace path.
Supported filename extensions include .xls, .xlsx, .xlsm, and .xlsb.
You can also specify a linked or embedded spreadsheet instead of a filename. Use the syntax
3rd Party:Embedding#
for embedded spreadsheets.Use the syntax
3rd Party:LinkedName.xls
for linked spreadsheets. Specify the name that displays in the Autodesk Inventor Model tree, under 3rd Party.If you use an embedded table, embed it using Link on the Parameters dialog box. Do not change the Embedded table name from the default name given to it by Autodesk Inventor (for example, Embedding 1).
GoExcel
requires the original name.Note: Do not include a space after the
:
character in the syntax3rd Party:Name
.To link a file, click Manage tab  Insert panel
  Insert Object , or use Link on the Parameters dialog box.
GoExcel.FindRow
Searches for a row based on one or more column value criteria.
Syntax
GoExcel.FindRow("filename", "sheetname", "first column title", "operator", value to look for, "second column title", "operator", value to look for, "third column title",...)
"filename"
Specifies the data file.
"sheetname"
The sheet in the Excel document containing the table to be searched. The sheet can be any existing sheet.
"first column title"
The title of first column in the table to be searched. Column titles usually are placed in row 1, starting in column A.
"operator"
Possible values include:
- <=
Find a row with a value in the column that is less than or equal to the specified value.
- >=
Find a row with a column value greater than or equal to the specified value.
- =
Find a row with a text or numeric column value equal to the specified value.
value to look for
A text or numeric value that can be specified with an explicit value, a parameter, or a local variable.
"second column title"
The title of the second column in the table to be searched.
"operator"
<= , >= , or =
value to look for
"third column title"
Find a row based on multiple criteria.
Returns
The row number (an integer) that matches the search criteria. The value is -1 if a matching row is not found.
Possible errors
- File not found
- Sheet name not found
- Column name not found
- Input value is wrong type (does not match column value type)
Excel table requirements
- Table configurations must be horizontal (configurations defined by rows, not columns).
- Columns must have titles in the first cell of the column.
- Lookup values can be numeric or text.
Examples
These examples set the value of the parameter variable
i
to the number of the row in the table.Dia
is equal to0.2
andLen
is greater than or equal to4.1
. The first example references an external spreadsheet, and the second example references an embedded spreadsheet.i = GoExcel.FindRow("mytable.xls", "Sheet1", "Dia", "=", 0.2, "len", ">=",4.1)
i = GoExcel.FindRow("3rd Party:Embedding 1", "Sheet1", "Dia", "=", 0.2, "len",">=", 4.1)
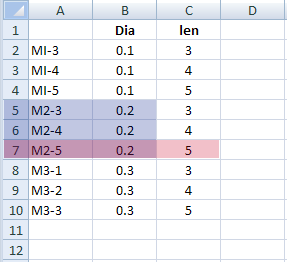
In these examples, rows 5, 6, and 7 meet the first condition that
Dia=.2
. However, only row 7 meets both criteria thatDia=.2
andlen>=4.1
.GoExcel.CurrentRowValue
Reads a value from the row found using the
GoExcel.FindRow
function.Syntax
GoExcel.CurrentRowValue("column name")
"column name"
Column title name for the cell value to retrieve from the current row.
Returns
Cell value from the column of the current row, previously found with the
GoExcel.FindRow
function.Errors
Returns an error message if the column is not found.
Example
i = GoExcel.FindRow("iLogic_SCHS.xls", "Sheet1", "thread_diameter", "=", Screw_Size, "screw-length", ">=", screw_length_required)
thread_diameter = GoExcel.CurrentRowValue("thread_diameter")
screw_length = GoExcel.CurrentRowValue("screw_length")
head_diameter = GoExcel.CurrentRowValue("head_diameter")
head_thickness = GoExcel.CurrentRowValue("head_thickness")
socket_size = GoExcel.CurrentRowValue("socket_size")
thread_pitch = GoExcel.CurrentRowValue("thread_pitch")
GoExcel.CellValue
Reads or writes values to spreadsheet cells.
Syntax
GoExcel.CellValue("filename", "sheetname", "cellnumber")
"filename"
See Specify the Excel file.
"sheetname"
Name of the sheet in the Excel document that contains the target cell. The sheet can be any existing sheet.
"cell number"
Cell address to read or write to (such as "A7"). You can also specify a named range in the worksheet scope.
Returns
- Value of cell
- No assignment when error occurs
Errors
- File not found
- Sheet name not found
Excel table format requirements
Cell values can be numeric or text.
Examples
Read an embedded spreadsheet:
head_rad = GoExcel.CellValue("3rd Party:Embedding 4", "Sheet1","A1")
Write to an embedded spreadsheet:
GoExcel.CellValue("3rd Party:Embedding 4", "Sheet1", "A1")= head_rad
Read an external spreadsheet:
head_rad = GoExcel.CellValue("Spreadsheet.xlsx", "Sheet1", "A5")
message =GoExcel.CellValue("Spreadsheet.xlsx", "Sheet1", "B5")
Write to an external spreadsheet:
GoExcel.CellValue("Spreadsheet.xls", "Sheet1", "A6") = "Hello World"
GoExcel.Save
Note: Requires
GoExcel.Save
to save changes to the spreadsheet:GoExcel.CurrentCellValue, GoExcel.CellValue
Reads from or writes to a specific cell address in a spreadsheet subsequent to using the
GoExcel.CellValue
orGoExcel.Open
function. This function uses the file and sheet opened previously.Syntax
GoExcel.CurrentCellValue("cellnumber")
GoExcel.CellValue("cellnumber") (without specifying a filename and sheet name)
"cellnumber"
Cell address or named range of the cell value to read from or write to the current spreadsheet.
Returns
The cell value from the specified cell number.
Errors
- No assignment on error
- Error message displays
Examples
Read a series of cells from a single spreadsheet:
head_rad = GoExcel.CellValue("Spreadsheet.xlsx","Sheet1","A1")
head_thick = GoExcel.CellValue("B1")
pin_length = GoExcel.CellValue("C1")
shaft_rad = GoExcel.CellValue("D1")
Write to a series of cells in a spreadsheet document:
GoExcel.CellValue("Spreadsheet.xlsx","Sheet1","A1") = head_rad
GoExcel.CellValue("B1") = head_thick
GoExcel.CellValue("C1") = pin_length
GoExcel.CellValue("D1") = shaft_rad
GoExcel.Save
GoExcel.NameRangeValue
Works like the
CellValue
function. Instead of a cell address, specify a named range defined in the Excel workbook. The name must be a name within the workbook, and the range must be confined to a single cell. You can access worksheet-scope named ranges using the standard CellValue syntax, using the name instead of a cell address.Use
GoExcel.CellValue
orGoExcel.Open
to open the Excel file before usingNamedRangeValue
in a rule.Syntax
GoExcel.NamedRangeValue("PinLength")
GoExcel.Open
Opens the specified Excel spreadsheet, and optionally activates a named worksheet. You can then use functions such as
GoExcel.FindRow
andGoExcel.CellValue
to extract information from or modify the worksheet.Syntax
GoExcel.Open("filename", "sheetname")
"filename"
See Specify the Excel file.
"sheetname"
Name of the sheet in the Excel document to activate. The sheet can be any existing sheet.
Returns
N/A
Errors
Excel file not found.
Examples
When no sheet name is specified, "Sheet1" is assumed.
GoExcel.Open("Spreadsheet.xls")
A different worksheet can also be specified.
GoExcel.Open("Spreadsheet.xls", "MyOtherSheet")
GoExcel.Save
Saves the current Excel document. Use this function if you have modified cells with the
GoExcel.CellValue
orGoExcel.CurrentCellValue
functions.Returns
N/A
Errors
N/A
Example
GoExcel.CellValue("Spreadsheet.xls", "Sheet1", "A1") = "Hello, World!"
GoExcel.CellValue("A2") = 5.42
GoExcel.Save
GoExcel.CellValues
This function serves two purposes:
- Reads values from a specified range of cells in an Excel spreadsheet, and assigns them to a multi-value list.
- Takes the values from a multi-value list, and writes them to a specified range of cells in an Excel spreadsheet.
Read from an Excel spreadsheet
You can read from a vertically oriented range of cells. The function reads values starting in the first cell and continues downward until the second cell specified in the function is reached:
Multivalue.List("parameter") = GoExcel.CellValues("filename.xls", "Sheet1", "A1", "A10")
If an empty string ("") replaces the second cell address, start reading at the first cell address and continue downward until an empty cell is encountered:
Multivalue.List("parameter") = GoExcel.CellValues("filename.xls", "Sheet1", "A1", "")
You can read from a horizontally oriented range of cells:
Multivalue.List("parameter") = GoExcel.CellValues("filename.xls", "Sheet1", "A1", "J1")
If the spreadsheet has been previously referenced in the rule, you can also omit the filename and sheet name:
Multivalue.List("parameter") = GoExcel.CellValues("B2", "G2")
Write to an Excel spreadsheet
You can write values to a vertically oriented range of cells. The function writes values starting in the first cell and continues downward, writing values until the second cell specified in the function is reached:
GoExcel.CellValues("filename.xls", "Sheet1", "A2", "A10") = Multivalue.List("parameter")
You can write values to a vertically oriented range of cells. If an empty string ("") replaces the second cell address, iLogic uses as many cells as required to contain all members of the multivalue list:
GoExcel.CellValues("filename.xls", "Sheet1", "A2", "") = Multivalue.List("parameter")
You can write values to a horizontally oriented range of cells:
GoExcel.CellValues("filename.xls", "Sheet1", "A1", "J1") = Multivalue.List("parameter")
If the spreadsheet has been previously referenced in the rule, you can also omit the filename and sheet name:
GoExcel.CellValues("B2", "G2") = Multivalue.List("parameter")
GoExcel.Close
Closes the current Excel spreadsheet.
GoExcel.TitleRow
Used before
GoExcel.FindRow
to specify the number of the row in the spreadsheet that contains the column names. The default row number is 1. Change this value if you have extra rows above your column name row.Example
GoExcel.TitleRow = 2
GoExcel.FindRowStart
Used before the
GoExcel.FindRow
function to specify the number of the first row in the spreadsheet that contains data. The default row number is 2.Syntax
GoExcel.FindRowStart =
The row at which the data starts.
Examples
The default value of 2 indicates that the data starts on row 2 and follows one title row:
GoExcel.FindRowStart = 2
If you have two title rows, add the following statement to the rule before the statement containing
GoExcel.FindRow
:GoExcel.FindRowStart = 3
GoExcel.ChangeSourceOfLinked
Provides access from iLogic rules to the Change Source operation.
This function replaces an Excel spreadsheet that is currently driving the model with another spreadsheet. The values contained in the new spreadsheet then drive the dimensions of the model.
Note: This function is also available as a manual operation from the context menu on linked Excel spreadsheets.
Syntax
changeOK = GoExcel.ChangeSourceOfLinked(partialOldName, newName)
partialOldName
Portion of the spreadsheet name to replace.
partialOldName
can be an empty string""
to match the first linked Excel file. Often, a part or assembly has only one Excel file.
newName
The entire new spreadsheet name, which can be an absolute or relative filename.
Example
If size = "small" Then
changeOK = GoExcel.ChangeSourceOfLinked("pipe"," smallpipe.xlsx")
ElseIf size = "medium" Then
changeOK = GoExcel.ChangeSourceOfLinked("pipe", "mediumpipe.xlsx")
ElseIf size = "large" Then
changeOK = GoExcel.ChangeSourceOfLinked("pipe", "largepipe.xlsx")
End If
GoExcel.Tolerance
Used with the
GoExcel.FindRow
function to search for a value within a range rather than an exact value. The default tolerance is 0.0000001 and is not dependent on document units.Syntax
GoExcel.Tolerance =
Set a higher tolerance to expand the range of acceptable values.
Example
You use the statement to search in the following manner:
GoExcel.Tolerance = 0.001
i = GoExcel.FindRow("Table1.xlsx", "Sheet1", "length", "=", 2.3)
The statement becomes equivalent to the following search with no tolerance:
i = GoExcel.FindRow("Table1.xlsx", "Sheet1", "length", ">=", 2.299, "length","<=", 2.301)
GoExcel.DisplayAlerts
Prevents the display of Excel prompt dialog boxes.
Syntax
GoExcel.DisplayAlerts = True
GoExcel.DisplayAlerts = False
True
Display the Microsoft Excel prompts (default).
False
Do not display the Excel prompts.
GoExcel.Application
Accesses the Excel Application object. Use this function only if you have experience with the Excel COM interface. Before using this function in a rule, call another GoExcel function to initialize the application.
Syntax
excelApp = GoExcel.Application
iPart and iAssembly functions
Use iPart and iAssembly functions to drive iPart and iAssembly configurations in an assembly. You can use a rule to change the current configuration of an iPart or iAssembly based on the conditions and logic you define.
These functions work for iAssemblies in the same way as they do for iParts, except that custom parameters can only be used for iParts. To use the function for an iAssembly, you can optionally substitute
iPart
withiAssembly
when specifying the function.To access the iPart and iAssembly functions, expand the iParts node under the System tab in the Snippets area.
Similar functions are available for iFeatures. See iFeature functions for more information.
iPart.ChangeRow
Changes the active row in an iPart or iAssembly table.
Syntax
iPart.ChangeRow("iChangedComponentName:1", "memberName")
"iChangedComponentName:1"
The name of the component as displayed in the Autodesk Inventor assembly browser. Change the default component name assigned by Inventor to stabilize it and prevent the name from changing when a different row is chosen in the table.
"memberName"
The name assigned to the row in the Member column of the table.
For an iPart with custom parameters, use this syntax to list the custom parameters after
"memberName"
. Show them in the same order as they appear in the table:
iPart.ChangeRow("iChangedComponentName:1", "memberName", customParam1,customParam2)
Use this syntax to specify a row number instead of a member name. The row number is an integer, starting at 1 for the first row (for standard iParts only):
iPart.ChangeRow("iChangedComponentName:1", rowNumber)
Example
In this example, the current iPart configuration is changed based on a conditional statement that evaluates an Inventor user parameter
Port_1_Size
. The function requires only the iPart component nameport_1_Flange_screw
and the iPart table Member nameScrew-01
to drive the active iPart configuration:If Port_1_Size = .50 Then
iPart.ChangeRow("port_1_flange_screw", "Screw-01")
ElseIf Port_1_Size = .75 Then
iPart.ChangeRow("port_1_flange_screw", "Screw-02")
ElseIf Port_1_Size = 1.00 Then
iPart.ChangeRow("port_1_flange_screw", "Screw-03")
End If
iPart.FindRow
Searches the iPart or iAssembly table by column for the row containing a specific or approximate value, and sets the active configuration to the row found.
Syntax
i=iPart.FindRow("iChangedComponentName:1", "columnName","<=",0.2,"columnName","<=", 4.1,"|",customParam1,customParam2)
i=iPart.FindRow("iChangedComponentName:1","columnName", "<=",d1,"columnName","<=",d2)
"i"
A local variable that can be used to test whether a valid row number is found.
"iChangedComponentName:1"
The name of the component as displayed in the Inventor assembly browser. Change the default component name assigned by Inventor to stabilize it and prevent the name from changing when a different row is selected in the table.
"columnName"
The column to search in the iPart table. Use the column header name exactly as it appears in the iPart table.
Example
This example searches an iPart table for a row with column values that are equal to or greater than the specified values. iLogic switches the current iPart configuration to the row found:
iPart.FindRow("port_1_flange_screw", "Thread_Diameter", ">=", 0.45, "Thread_Length", ">=", 2.0)
iPart.CurrentRowValue
Once a row has been found using
iPart.FindRow
, this function reads associated column values from that row. This function reads numeric values only. UseiPart.CurrentRowStringValue
to read columns containing text values.Syntax
d0 = iPart.CurrentRowValue("columnName")
Any of the following sets the current row:
-
iPart.FindRow
-
iPart.ChangeRow
-
iPart.RowName
-
iPart.RowNumber
iPart.FindRow
oriPart.ChangeRow
.
"columnName"
The name of the iPart table column you want.
Example
In this example, we search the
Port_Size
column of theport_1_flare_flange
iPart table for an exact value that matches the value of the Inventor parameterPort_1_Size
. Once the row is found, we useiPart.CurrentRowValue
to retrieve the dimensions from theA_dim
andB_dim
columns of the table. Then, we assign their values to the Inventor parameters namedPort_1_screw_A_dim
andPort_1_screw_B_dim
:i = iPart.FindRow("port_1_flare_flange", "Port_Size", "=", Port_1_Size)
Port_1_screw_A_dim = iPart.CurrentRowValue("A_dim")
Port_1_screw_B_dim = iPart.CurrentRowValue("B_dim")
iPart.CurrentRowStringValue
Once a row has been found using
iPart.FindRow
, use this function to read associated column values from that row. This function is likeiPart.CurrentRowValue
, except that it reads text values only. UseiPart.CurrentRowValue
to read columns containing numeric values.Syntax
iPart.CurrentRowStringValue("PartNumber")
Alternative syntax for the component name
To specify a component name that does not change when the iPart row is changed.
iPart.ChangeRow("iParentFileName:1", "memberName")
iPart.FindRow("iParentFileName:1","columnName","<=",d1,"columnName","<=",d2)
"iParentFileName:1"
The iPart parent file name, where
":1"
replaces the usual .ipt or .iam extension. Change the":1"
to the number of the component you are working with.Although this syntax is supported, it is not recommended. A more standard method is to change the component name to stabilize it.
iPart.RowName
Gets the member name of the active row in an iPart or iAssembly component instance. This function is useful in rules triggered by the iPart or iAssembly Change Component event. Use iPart.ChangeRow or iPart.FindRow to select a row automatically from a rule. If you want to allow the user to select a row manually, you can combine that event with this function to react to the change.
Note: After using this function, you can use
iPart.CurrentRowValue
oriPart.CurrentRowStringValue
to retrieve values of other cells in the active row.Syntax
iPart.RowName("iChangedComponentName:1")
Example
memberName = iPart.RowName("port_1_flange_screw:1")
iPart.RowNumber
Gets the row number of the active row in an iPart or iAssembly component instance.
Note: After using this function, you can use the
iPart.CurrentRowValue
oriPart.CurrentRowStringValue
to retrieve values of other cells in the active row.Syntax
iPart.RowNumber("iChangedComponentName:1")
Example
rowNumber = iPart.RowNumber("port_1_flange_screw:1")
iPart.Tolerance
Used with the
iPart.FindRow
function, this function allows you to search for a value within a range rather than searching for an exact value. There is always a tolerance for this search. The default tolerance is 0.0000001 and is not dependent on document units.Syntax
iPart.Tolerance =
Set a higher tolerance to expand the range of acceptable values.
Example
Suppose you use the following statements:
iPart.Tolerance = 0.001
i = iPart.FindRow("Block:1","length", "=", 2.3)
Together, these statements become equivalent to the following search with no tolerance:
i = iPart.FindRow("Block:1", "length", ">=", 2.299, "length","<=", 2.301)
To replace an iPart member with a member from a different factory, use
Component.ReplaceiPart
.
iFeature functions
Use iFeature functions to choose a row in a table driven iFeature. Each row has a set of parameter values to drive the iFeature.
iFeature functions operate within a part in which the iFeature is placed (instantiated).Their syntax is like the syntax used for the
GoExcel
andiPart
functions.To access the iFeature functions, expand the iFeatures node under the System tab in the Snippets area.
iFeature.ChangeRow
Changes the active row of a table-driven iFeature.
Syntax
iFeature.ChangeRow("iFeatureName", "rowName")
"iFeatureName"
The name of the iFeature as displayed in the model tree.
"rowName"
The desired value of the key parameter in the iFeature table.
If the iFeature has more than one key parameter, specify them all in a text string of the form
[Key1=Value1][Key2=Value2]
. For example:[Size=A0][CutLength=0.4375000 in]
This example is the
iFeatureTableRow.MemberName
property, as described in the Inventor API documentation. For an alternative way to specify several parameter values, useiFeature.FindRow
.You can also use an integer row number:
iFeature.ChangeRow("iFeatureName", rowNumber)
Example
In this example, the current iFeature configuration is changed based on a conditional statement that evaluates
size
, which is a text parameter.iFeature.ChangeRow
requires only the iFeature component nameRectangularPocket1
and the iFeature tableKey Column
name"Pocket-01"
to drive the active iFeature configuration:If size = "small" Then
iFeature.ChangeRow("RectangularPocket1", "Pocket-01")
ElseIf size = "medium" Then
iFeature.ChangeRow("RectangularPocket1", "Pocket-02")
ElseIf size = "large" Then
iFeature.ChangeRow("RectangularPocket1", "Pocket-03")
ElseIf size = "very large" Then
iFeature.ChangeRow("RectangularPocket1", "Pocket-04")
End If
iFeature.FindRow
Searches for a row based on one or more column value criteria. If it finds a row, it changes the active row of the iFeature to that row.
Syntax
i = iFeature.FindRow("iFeatureName", "columnName", "<=", 0.2, "columnName", "<=", 4.1)
"iFeatureName"
The name of the table-driven iFeature.
"columnName"
The title of the column to be searched.
Operators
- "=" finds a row with a value equal to the value specified.
- ">=" finds a row with a value equal to or greater than the value specified.
- ">=" finds a row with a value equal to or greater than the value specified.
The value can be a numerical value or a text string. It can be specified using an explicit value, parameter, or local variable.)
Returns
- Row number (integer) of the row that matches the search criteria.
- -1 if the row was not found.
iFeature.CurrentRowValue("columnName")
Reads a value from the row found using the
iFeature.FindRow
function, where"columnName"
is the column title name. It returns the cell value of the current row value returned by theiFeature.FindRow
function. For example:i = iFeature.FindRow("RectangularPocket1", "pocketdepth", "=", 0.250)
pocketlength = iFeature.CurrentRowValue("pocketlength")
pocketwidth = iFeature.CurrentRowValue("pocketwidth")
If the column does not exist in the iFeature, the rule displays an error message.
iFeature.CurrentRowStringValue("columnName")
Use this function when the entry being sought in the iFeature table is a text string. For example:
Part_number = iFeature.CurrentRowStringValue("Part Number")
iFeature.Tolerance
Used with the
iFeature.FindRow
function, this function allows you to search for a value within a range rather than searching for an exact value. There is always a tolerance for this search. The default tolerance is 0.0000001 and is not dependent on document units.Syntax
iFeature.Tolerance =
Set a higher tolerance to expand the range of acceptable values.
Example
iFeature.Tolerance = 0.001
i = iFeature.FindRow("insertpocket", "pocketlength", "=", 2.0)
This example matches a row with a
pocketlength
value of 2.0004.
Assembly Constraint functions
iLogic provides rule functions for driving the suppression state of assembly constraints. These functions are useful when defining assembly level configurations with iLogic rules.
For example, suppose you are defining alternate positions for a component in an assembly. You can define all mates necessary to constrain the component in each location. Then, you can use a rule to suppress and unsuppress the mates as necessary to move the component in each configuration.
Autodesk Inventor does not allow constraints that conflict. Create the constraints for one position of a component, and then manually suppress them before creating additional sets of constraints for alternate component positions. Once you have created all constraints necessary to position the component for each configuration, you can write the rules that choose between the constraints.
To access the Constraint functions, expand the Constraints node under the System tab in the Snippets area.
Constraint.IsActive
Sets or reads the suppression state of a top-level assembly constraint.
Assign each constraint referenced in a rule a unique custom name:
- The rules are more easily understood.
- Renaming a mate "stabilizes" the name to help prevent automatic changes to a name which can result in the rule being unable to find the constraint.
If you manually change the suppression state of a constraint, it does not cause rules that reference it to fire automatically.
Syntax
Constraint.IsActive("Mate:1")
Constraint.IsActive("SubAssem.iam", "Mate:1")
Examples
Set the suppression state:
If ConfigStyle = "A" Then
Constraint.IsActive("MateLeftSide:1") = true
Constraint.IsActive("MateRightSide:2") = false
ElseIf ConfigStyle = "B" Then
Constraint.IsActive("MateLeftSide:1") = false
Constraint.IsActive("MateRightSide:2") = true
End If
Read the suppression state:
If Constraint.IsActive("MateLeftSide:1") Then (Do something)
Set or read the suppression state of a constraint in a subassembly (specify the subassembly file name and name of the constraint):
Constraint.IsActiveInDoc("SubAssem.iam", "Mate:1")
To copy and rename all the files in an assembly while keeping all the rules intact, use
Constraint.IsActiveInComponent
and specify a subassembly name instead of the filename.Set using subassembly name:
If ConfigStyle = "A" Then
Constraint.IsActiveInDoc("SubAssem.iam", "LeftMate") = true
Constraint.IsActiveInDoc("SubAssem.iam", "RightMate") = false
ElseIf ConfigStyle = "B" Then
Constraint.IsActiveInDoc("SubAssem.iam", "LeftMate") = false
Constraint.IsActiveInDoc("SubAssem.iam", "RightMate") = true
End If
Read using subassembly name:
Constraint.IsActiveInDoc("SubAssem.iam","LeftMate") = true then (Do something)
Constraint.iMateDefIsActive
Suppresses or unsuppresses an iMate definition.
Constraint.iMateDefIsActive("iMate:1") = False
Suppresses the iMate definition with the name
iMate:1
in the current rule document. The result is the same as suppressing it with the context menu in the user interface. While suppressed, the iMate definition is not available for mating purposes.Constraint.iMateDefIsActive("SubAssem:1","iMate:1) = False
Suppresses the iMate definition with the name
iMate:1
, in the componentSubAssem:1
.Constraint.iMateDefIsActive(PartA:1","iMate:1") = True
Unsuppresses the iMate definition with the name
iMate:1
, in the component partPartA:1
.
Measure functions
Use Measure functions to find and return values for distance, angle, area, perimeter, and extents dimensions.
To access the Measure functions, expand the Measure node under the System tab in the Snippets area.
Measure Distance and Angle
You can measure the distance or angle between two (or three for angle) entities. You specify the entities on either end of the measurement by name. A name can refer to:
- A work feature such as a work plane, work axis, or work point in a part or assembly. The work feature can be a standard Inventor work feature such as
XY Plane
orX Axis
. - An iMate attached to a face, edge, or vertex. Use this method to assign the element a permanent name. You are not required to use the iMate for a constraint. The iMate can be suppressed.
The entities can be in the same part or assembly, or in different components within an assembly.
You can also measure between two components in an assembly by finding the closest points on each component and reporting the distance between them.
Include the
RuleParametersOutput
andInventorVb.DocumentUpdate()
functions (in that order) before the Measure functions in a rule. The use of these functions ensures that the Measure function is examining an updated version of the Inventor model.Measure.MinimumDistance
Measures the minimum distance between two points, planes or axes. The function can also measure the distance between a plane and a point, a plane and an axis, or a point and an axis.
Syntax
Measure.MinimumDistance("entityName1","entityName2")
Examples
To measure Point to Point:
distance = Measure.MinimumDistance("Work Point1", "Work Point2")
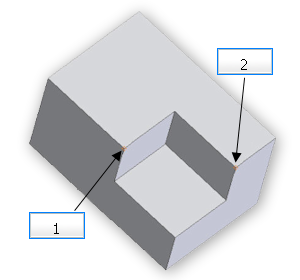
(1) Work Point1 (2) Work Point2
To measure Point to Axis:
distance = Measure.MinimumDistance("Work Point1", "Work Axis1")
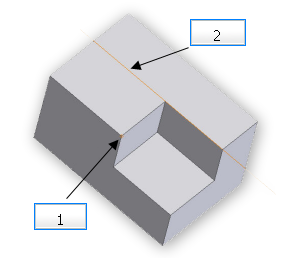
(1) Work Point1 (2) Work Axis1
To measure Axis to Axis:
distance = Measure.MinimumDistance("Work Axis1", "Work Axis2")
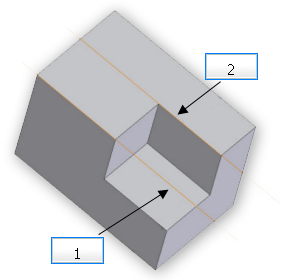
(1) Work Axis1 (2) Work Axis2
To measure Plane to Plane:
distance = Measure.MinimumDistance("Work Plane1", "Work Plane2")
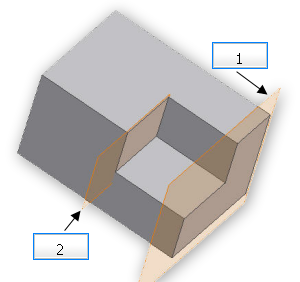
(1) Work Plane1 (2) Work Plane2
Measure.MinimumDistance("componentName1", "entityName1", "componentName2", "entityName2")
Measures the distance between entities within two components in an assembly. These entities can be points, planes, or axes.
For example, to measure the distance between planes in two components in an assembly:
distance = Measure.MinimumDistance("Wheel1", "Workplane1", "Wheel2", Workplane2")
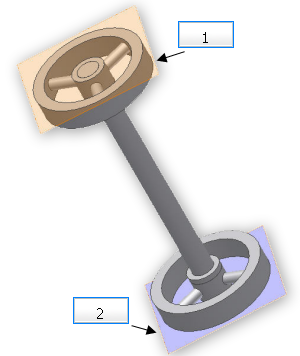
(1) Wheel1 Workplane1 (2) Wheel2 Work Plane2
Measure.MinimumDistance("componentName1", "componentName2")
Measures the minimum distance between the two components of an assembly. It looks at the components as a whole, and finds the closest points anywhere on the components, as shown in the following examples:
distance = Measure.MinimumDistance("partA:1", "partB:1")
distance = Measure.MinimumDistance("Wheel1", "Wheel2")
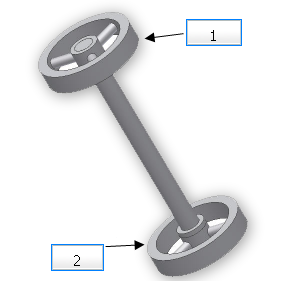
(1) Wheel1 (2) Wheel2
Use caution when measuring non-parallel axes!
Suppose your assembly consists of two blocks. The angle between the faces of the blocks is 60 degrees. Each block has a hole on the side facing the other block. The axes of these two holes are non-parallel coplanar lines which intersect. You write your function as:
distance = Measure.MinimumDistance("Block1","Axis1","Block2","Axis1")
You could expect the measurement to be made as if the lines had an infinite length, which would result in a distance of zero. However, when the
Measure.MinimumDistance
function is used, the distance is measured from the closest end points of the two markers used to represent the axes locations. Therefore, the measurement is made on the finite lines, and the value returned is 1.36 inches.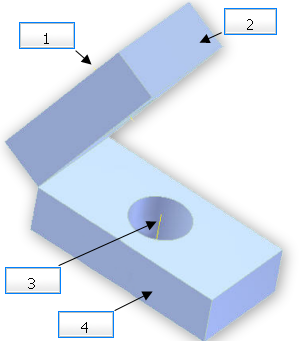
(1) Axis1 (2) Block1 (3) Axis2 (4) Block2
To produce a different result, you can manually extend the lines representing the axes of the holes. The
Measure.MinimumDistance
function now returns a value of 0 inches, as expected for lines that intersect.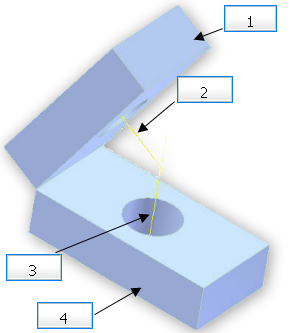
(1) Block1 (2) Axis1 (3) Axis2 (4) Block2
Measure.Angle
Measures the angle between two entities or as defined by three points.
angle = Measure.Angle("entityName1", "entityName2")
Measures the angle between two entities in a part or assembly. It can measure the angle between two axes, two planes, or an axis and a plane. The entities can be work features or iMates.
angle = Measure.Angle("componentName1", "entityName1", "componentName2", "entityName2")
Measures the angle between two entities in two components at the assembly level. It can measure the angle between two axes, two planes, or an axis and a plane.
angle = Measure.Angle("point1", "point2", "point3")
Measures the angle defined by three points. This value is equivalent to the angle between two lines:
- Line 1 extends from
"point1"
to"point2"
. - Line 2 extends from
"point2"
to"point3"
.
In this case,
"point2"
is the vertex of the angle. For example:angle = Measure.Angle("Work Point1", "Work Point2", "Work Point3")
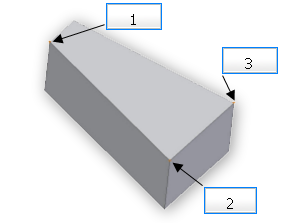
(1) Work Point1 (2) Work Point2 (vertex) (3) Work Point3
angle = Measure.Angle("componentName1", "point1", "componentName2", "point2", "componentName3", "point3")
Measures the angle defined by three points.
"point2"
defines the vertex of the angle. Each point can be in a different component.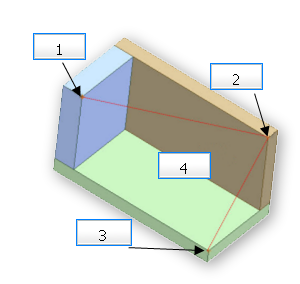
(1) Work Point1 Component1 (2) Work Point2 Component 2 (vertex of angle) (3) Work Point3 Component3 (4) 74.02 degrees
Measure.Area
Measures the area of a sketch. This function measures the sum of the areas of the regions enclosed by the closed profiles in a sketch.
Syntax
Measure.Area("SketchName")
Examples
For a single closed profile, the function calculates the area enclosed by the profile:
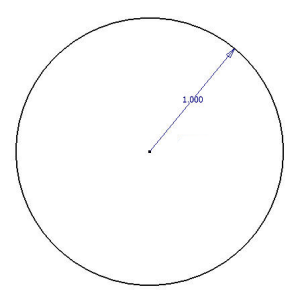
Area: 3.14 = sq. in.
If the sketch contains multiple closed profiles, the function calculates the sum of the areas enclosed by the profiles:
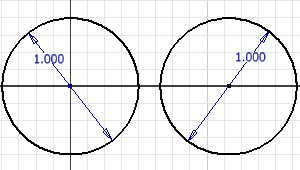
Area: 6.28 = sq. in.
If the closed profiles intersect, then the function calculates the sum of the enclosed areas, regardless of whether the areas overlap:
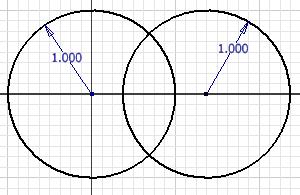
Area: 6.28 = sq. in.
If the sketch contains multiple profiles, with one of the profiles contained completely in the other one, the
Measure.Area
function returns the difference between the two areas: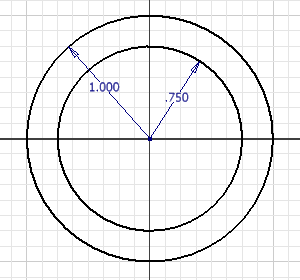
Area: 1.37 = sq. in.
Measure.Perimeter
Measure.Perimeter("SketchName")
Measures the sum of the perimeters of the closed profiles in a sketch. For a sketch containing a single closed profile, this function calculates the length of the perimeter of the profile.
Syntax
size = Measure.Perimeter("Sketch1")
Examples
For a sketch containing a single closed profile, this function calculates the length of the perimeter of the profile.
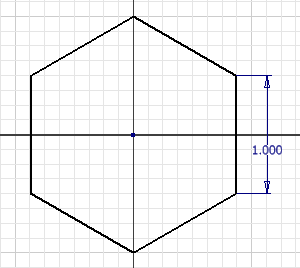
Perimeter: 6 inches
For a sketch containing non-intersecting multiple closed profiles, the function calculates the sum of the lengths of all profile perimeters:
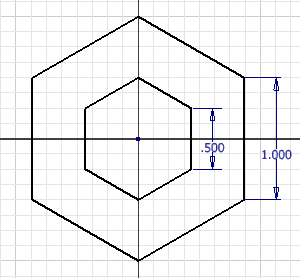
Perimeter: 9 inches
For a sketch containing intersecting multiple closed profiles, the function calculates the sum of the lengths of all profile perimeters:
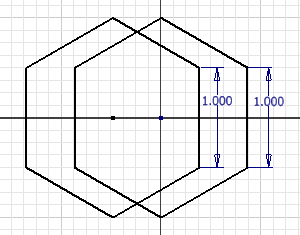
Perimeter: 12 inches
Measure.Extents
Measures the X, Y, or Z dimensions of the extents in a part or assembly. The extents can be larger than the exact dimensions of the model along that axis, especially if there are curved shapes.
Note: These functions only measure the extents of visible entities, including planes, workpoints, surfaces, and bodies. Hidden entities are not measured.
Syntax
Measure.ExtentsLength
Measures the X extent (along the red axis) of the model.
Measure.ExtentsWidth
Measures the Y extent (along the green axis) of the model.
Measure.ExtentsHeight
Measures the Z extent (along the blue axis) of the model.
Work Feature functions
Use Work Feature functions to modify existing work features.
To access the Work Feature functions, expand the Work Features node under the System tab in the Snippets area.
WorkPlane.FlipNormal
Conditionally flips the normal vector of a work plane. This action flips the work plane over. If a sketch is built on the plane, it is flipped over as well. This function can be used to change a feature from left-handed to right-handed. It is most useful for a mid-plane extrusion. The function does not flip the normal every time you use it; instead, it ensures that the normal is in the direction you want. The function flips the normal if it is not "in agreement" with the axis you specify.
Syntax
WorkPlane.FlipNormal("workPlaneName", "axisWanted")
"workPlaneName"
The name of the work plane to be flipped.
"axisWanted"
The name of axis of a part, optionally prefixed with a negative sign (-) to indicate the direction. This convention provides the function the approximate direction for the plane normal. If the plane is not exactly aligned to an axis in the model, use the axis that is closest to the desired plane normal. Alignment within 60 degrees is acceptable.
Examples
WorkPlane.FlipNormal("Work Plane1", "X")
WorkPlane.FlipNormal("Work Plane1", "-X")
WorkPlane.FlipNormal("Work Plane1", "Y")
WorkPlane.FlipNormal("Work Plane1", "-Y")
WorkPlane.FlipNormal("Work Plane1", "Z")
WorkPlane.FlipNormal("Work Plane1", "-Z")
Sketch.Redefine
Redefines a sketch using alternative inputs. This function is most effective for self-contained sketches that do not contain any projected geometry. Constrain all sketch geometry to the origin or to one of the sketch axes, using coincident or fix constraints or dimensions.
This function requires names as input; therefore, define the sketch using named items:
- work features
- standard planes or axes
- faces, edges, or vertices associated with iMates
Syntax
Sketch.Redefine(sketchName, planeName, originName, axisName, AxisIsX := True, NaturalAxisDirection := True )
sketchName
Name of the sketch.
planeName
Name of an entity to use as the sketch plane.
originName
Name of an entity to use as the origin point of the sketch.
axisName
Name of an entity to use as a sketch axis (either X or Y axis).
AxisIsX
Default value of
True
indicates that the sketch axis specified byaxisName
is the X (horizontal) axis.False
indicates that the axis is the Y (vertical) axis.
NaturalAxisDirection
Default value of
True indicates
that the sketch axis is in the same direction as the axisName entity.False
indicates that the sketch axis is in the opposite direction.
Message Box functions
Use Message Box functions to create message boxes and data input boxes in a rule.
MessageBox.Show and InputBox are standard VB.NET functions. Consult your VB.NET documentation for more information.
MessageBox.Show is a VB.NET version of the MsgBox function from VB6 and VBA. You can still use MsgBox in iLogic rules.
InputListBox and InputRadioBox are iLogic functions.
To access the Message Box functions, expand the MessageBox node under the System tab in the Snippets area.
You can use the Message Box wizard from the Add Rule dialog box to help you write code for a message box.
MessageBox.Show
Acts as the base for the Message Box functions in iLogic. Use this function to show a message box.
Syntax
MessageBox.Show("Message", "Title")
"Message"
The contents of the text area of the message box.
"Title"
The contents of the title bar of the message box.
MessageBoxButtons
You can specify the buttons included in a message box by using the MessageBoxButtons parameter to specify the appropriate values in the
MessageBox.Show
function.For example:
MessageBox.Show("Message",'"Title", MessageBoxButtons.OK)
This option produces a simple message box with the OK button:
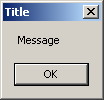
Other options include:
MessageBox.Show("Message",'"Title", MessageBoxButtons.OKCancel)
MessageBox.Show("Message",'"Title", MessageBoxButtons.RetryCancel)
MessageBox.Show("Message",'"Title", MessageBoxButtons.YesNo)
MessageBox.Show("Message",'"Title", MessageBoxButtons.YesNoCancel)
MessageBox.Show("Message",'"Title", MessageBoxButtons.AbortRetryIgnore)
MessageBoxIcon
You can add an icon to a message box by including the
MessageBoxIcon
parameter in theMessageBox.Show
function.For example:
MessageBox.Show("Message",'"Title", MessageBoxButtons.YesNoCancel, MessageBoxIcon.Error)
This option adds an error icon to the message box:
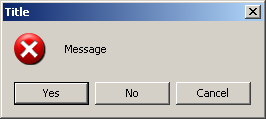
Other options include:
MessageBox.Show("Message",'"Title", MessageBoxButtons.YesNoCancel, MessageBoxIcon.Exclamation)
MessageBox.Show("Message",'"Title", MessageBoxButtons.YesNoCancel, MessageBoxIcon.Information)
MessageBox.Show("Message",'"Title", MessageBoxButtons.YesNoCancel, MessageBoxIcon.None)
MessageBox.Show("Message",'"Title", MessageBoxButtons.YesNoCancel, MessageBoxIcon.Question)
MessageBox.Show("Message",'"Title", MessageBoxButtons.YesNoCancel, MessageBoxIcon.Stop)
MessageBox.Show("Message",'"Title", MessageBoxButtons.YesNoCancel, MessageBoxIcon.Warning)
DefaultButton
You can specify the message box button to select when the message box is first displayed. To specify the button, include the
MessageBoxDefaultButton
parameter in theMessageBox.Show
function. Choose from among the three potential buttons on the message box, depending on the MessageBoxButtons value used.For example:
MessageBox.Show("Message",'"Title", MessageBoxButtons.YesNoCancel, MessageBoxIcon.Exclamation, MessageBoxDefaultButton.Button2)
This option specifies that the second button (No) is selected by default:
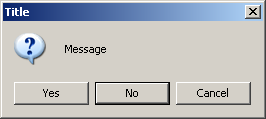
Other options include:
MessageBox.Show("Message",'"Title", MessageBoxButtons.YesNoCancel, MessageBoxIcon.Exclamation, MessageBoxDefaultButton.Button1)
MessageBox.Show("Message",'"Title", MessageBoxButtons.YesNoCancel, MessageBoxIcon.Exclamation, MessageBoxDefaultButton.Button3)
InputBox
Creates a message box that prompts for and accepts input.
Syntax
myparam = InputBox("Prompt", "Title", "Default Entry")
"Prompt"
Message to appear in the box.
"Title"
Text to appear in the title bar of the box.
"Default Entry"
Text to display in the input field of the box.
Example
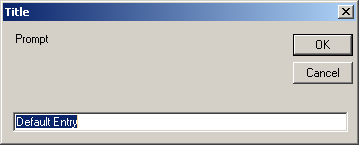
InputListBox
Displays a message box with a list of available values. When a value is selected from the list, the function returns that value.
Syntax
d0 = InputListBox("Prompt",MultiValue.List("listName"), defaultEntry, Title := "Dialog Title", ListPrompt := "List Prompt")
"Prompt"
Message to appear above the OK button in the box.
MultiValue.List("listName")
Name of the multi-value list to use.
defaultEntry
Value selected initially in the list box.
Title
Text to appear in the title bar.
ListPrompt
Message
Text to appear above the list in the box.
Returns
d0
Value from the list that was selected.
Example
material = InputListBox("Choose Part material", MultiValue.List("material"), _
material, Title := "Part material", ListName := "Available Standard materials")
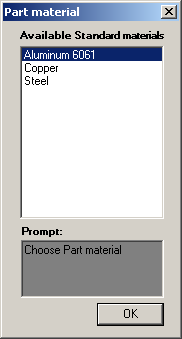
Note: The list selections can be created in the parameters section of Inventor.
In the Parameters dialogue ('Manage' ribbon tab), right click the equation field and select Edit Multi-Value List to display the Value List Editor dialog box. From here you can enter values to be returned by the InputListBox command.
InputRadioBox
Displays a message box that prompts for one of two available options.
Syntax
booleanResult= InputRadioBox("Prompt", "Button1 Label", "Button2 Label", booleanParam, Title :="Title")
"Prompt"
Message to appear in the box.
"Button1 Label"
Message to appear for the first option.
"Button2 Label"
Message to appear for the second option.
booleanParam
Specify
True
to select the first option, orFalse
to select the second option.
Title
The text to appear in the title bar of the box.
Returns
booleanResult
True if the first option is selected, False if the second option is selected.
Example
booleanParam= InputRadioBox("Choose an Edge Treatment option", "Chamfer", "Fillet", true, Title :="Edge Treatment")
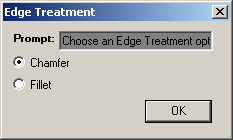
Document functions
Use Document functions to access the Inventor part, assembly, or drawing document. Document functions allow you to perform tasks such as getting the filename and updating the model.
In Document functions,
ThisDoc
refers to the Autodesk Inventor document in which the rule is written. It is often the active document, but it can also be a part within an assembly. Wherever the rule is stored,ThisDoc
gives you access to that document.To access the Document functions, expand the Document node under the System tab in the Snippets area.
Path
Returns the document path (folder name) as a text string.
Syntax
ThisDoc.Path
FileName
Returns the filename of the document.
Syntax
ThisDoc.FileName(False)
The file extension is not included when
False
is provided as an argument. If you want the file extension, substituteTrue
as the argument.PathAndFileName
Returns the path and the file name of the document.
Syntax
ThisDoc.PathAndFileName(False)
The file extension is not included when
False
is provided as an argument. To include the file extension, substituteTrue
in the parentheses.ChangeExtension
Creates a filename using the filename of the document and a changed extension.
Syntax
changedName = ThisDoc.ChangeExtension(".new")
WorkspacePath
Returns the path (folder name) of the active Autodesk Inventor project workspace. If no workspace is defined, this function returns an empty string (a string with no characters, with length = zero).
Syntax
ThisDoc.WorkspacePath()
Launch
Launches a file based on the path and filename (including extension) provided. If a data file is specified, it opens in its native application. If an executable file (.exe) is specified, it runs the program. If you do not specify a complete path, iLogic looks for the file in the same folder as the Inventor document. You can also specify a relative name and path to the document folder.
Syntax
ThisDoc.Launch("path\file.ext")
Save
Saves the currently active document. This function does not work in a rule triggered by a parameter change event.
Syntax
ThisDoc.Save
UpdateWhenDone
Updates the document that the rule is in, after the rule (and any rule it triggers) finishes running. This update is the same as clicking the Update button in the user interface.
Syntax
iLogicVb.UpdateWhenDone = True
RuleParametersOutput
If your rule has changed any parameter values, this function applies new rule values to the Inventor model. If this function is not used, the values are not applied until the rule has finished running. Use this function if you must perform an Update using
DocumentUpdate
. Also use this function if you are using theiLogicVb.RunRule
function, so that the other rule gets the new values of the parameters.Syntax
RuleParametersOutput()
DocumentUpdate
Performs an immediate update in the current document (the document that the rule is in) and updates the display. Use this function if you require that the geometry be rebuilt (for example, you are calculating mass using
iProperties.Mass
). If the rule fires other rules (by changing parameters), enable the Fire dependent rules immediately option for the rule in the Edit Rule dialog box. This option ensures that the other rules have finished running when you perform the update.Syntax
InventorVb.DocumentUpdate()
DocumentUpdate(False)
Performs an immediate update in the current document (the document that the rule is in) without updating the document display. The function
InventorVb.DocumentUpdate
updates the display as well as the model. If you do not want the display to update, use this function instead.Syntax
InventorVb.DocumentUpdate(False)
Display Only Update
This Inventor API function updates only the display, and not the model.
Syntax
ThisApplication.ActiveView.Update()
CheckParameters
Verifies parameter values but does not change any values.
Use this function for situations such as the following:
Suppose your parameters are linked to a base part, and in the base part they are linked to an external spreadsheet. It is possible to change parameter values in the spreadsheet and save it without those changes showing up in the main part. Use this function in a rule within the main part before using
GoExcel
to change values in the spreadsheet. This function ensures that the base part is loaded (in the background) and that changes propagate through to the main part of the assembly.Syntax
InventorVb.CheckParameters("")
File Save As
Saves the document under a new filename and, optionally, a new extension.
Syntax
ThisDoc.Document.SaveAs(NewFileNameAndExtension , True)
True
Set to
True
to perform a Save Copy As operation, or set toFalse
to perform a Save As operation.
Run Other functions
iLogic provides several variations of a function that can be used to run other functions. Typically, you change a parameter in a rule to trigger the rule. This function is useful for rules without parameters, or rules flagged with the Don't run automatically option.
To access these functions, expand the Run Other node under the System tab in the Snippets area.
RunRule
Runs another rule by specifying just the name of the rule. Use this function for rules such as report generators that do not affect the model, but can refer to many parameters. You can run any rule with this function.
Syntax
iLogicVb.RunRule("ruleName")
Example
iLogicVb.RunRule("Rule0")
RunRule in Component
Runs another rule stored in a component within an assembly.
Syntax
iLogicVb.RunRule("componentName", "ruleName")
Example
iLogicVb.RunRule("PartA:1", "Rule0")
For other functions listed in the Run Other category of the Snippets area, see "Advanced API Functions" and "Advanced Rule Programming."
RunExternalRule
Runs an external rule from a standard rule in an Autodesk Inventor document.
Syntax
iLogicVb.RunExternalRule("ruleFileName")
"ruleFileName"
Specifies the name of the rule file, with or without the file extension. You can also specify a file path here, although it can affect the portability of the file. iLogic looks for the rule file in the following folders, in the order listed:
- The folder in which the current Inventor document is located (allows models to be copied with associated rules)
- The current Inventor Project Workspace folder
- The list of folders set in iLogic Configuration (generally for work group or company rules)
Rule filenames can be relative path names, based in any of these folders.
External rules run from another rule do not have to display in the Rule Browser; however, to edit the rule, add it to the Rule Browser.
Example
iLogicVb.RunExternalRule("color_by_vendor")
RunMacro
Runs an Inventor Visual Basic for Applications (VBA) macro. Macros can be stored in the document or in separate .ivb files. Use Alt + F11 to open the Microsoft VBA editor and view the available macros, and to load or edit macros. If the macro requires arguments, add them after the macro name.
You can call a VBA Function, but you cannot get a return value.
Note: Eventually, VSTA will replace VBA. While we do not recommend that you create new VBA macros,
RunMacro
is available if you have existing VBA macros.Syntax
InventorVb.RunMacro("projectName", "moduleName", "macroName")
Examples
InventorVb.RunMacro ("DocumentProject", "Module1", "DrawCustomLines" )
InventorVb.RunMacro ("ThreadMacros", "Module1", "ThreadsInit" )
InventorVb.RunMacro ("ThreadMacros", "Module1", "AddThreads", "3/8-16 UNC")
AddReference
Required if you want to use external .NET code (see "Advanced Rule Programming").
Syntax
AddReference "fileName.dll"
BOM functions
Use BOM functions to perform operations on the Bill of Material in an assembly.
You can override the calculated component quantity shown in the BOM. You can also export BOM data to Excel and other formats.
To access the BOM functions, expand the BOM node under the System tab in the Snippets area.
Export
Export the BOM to an external file.
Note: This function only works at the Master Level of Detail in the assembly.
Syntax
ThisBOM.Export("BOMViewName", filename, format)
"BOMViewName"
The name that appears in a tab in the Inventor Bill of Materials dialog box. This value can be
Model Data
,Structured
, orParts Only
. Enable the view you want to use before you run the rule for the first time (right-click on the tab in the BOM table).
filename
Name of the export file to create (with filename extension). If you do not specify a full path, the BOM is exported to the folder in which the assembly is stored. For an Excel export, the filename extension must be .xls (.xlsx is not supported).
format
Can be one of the following:
-
kMicrosoftAccessFormat = Microsoft Access
-
kMicrosoftExcelFormat = Microsoft Excel
-
kdBASEIVFormat = dBASE IV
-
kdBASEIIIFormat = dBASE III
-
kTextFileTabDelimitedFormat = Text File Tab Delimited
-
kTextFileCommaDelimitedFormat = Text File Comma Delimited
-
kUnicodeTextFileTabDelimitedFormat = Unicode Text File Tab Delimited
-
kUnicodeTextFileCommaDelimitedFormat = Unicode Text File Comma Delimited
Examples
ThisBOM.Export("Parts Only", "Bom353.xls", kMicrosoftExcelFormat)
ThisBOM.Export("Structured", "Bom631.xls", kTextFileTabDelimitedFormat)
ThisBOM.Export("Structured", ThisDoc.ChangeExtension(".mdb"), kMicrosoftAccessFormat)
OverrideQuantity
Overrides the quantity for a component. This function can be useful if you only show a few instances in the model, and the BOM lists the actual number. It is like opening the Bill of Materials dialog box, and then choosing "Static Quantity" instead of "Calculate Quantity" in the QTY column for a component.
Syntax
ThisBOM.OverrideQuantity("Model Data", partNumber, quantity)
The first argument names the BOM view and must always be
"Model Data"
.
partNumber
The Part Number property of the component. This value shows up as a column in the BOM view.
quantity
Quantity to set for this component.
Example
ThisBOM.OverrideQuantity("Model Data", "Top Screw", 18)
CalculateQuantity
Sets the BOM quantity back to the automatically calculated quantity.
Syntax
quantity = ThisBOM.CalculateQuantity("Model Data", "partNumber")
Example
quantity = ThisBOM.CalculateQuantity( "Model Data", "Top Screws")
Math functions
iLogic provides a set of Math functions that can be added to rules. In the iLogic Edit Rule dialog box, use one of the following methods to access the Math functions:
- Expand the Math node under the System tab in the Snippets area.
- Right-click in the rule text area, and select Math Functions.
Standard Math functions
The standard VB.NET Math library provides most of the Math functions used in iLogic:
| IsNumeric | PI |
| MinOfMany | Sqrt |
| MaxOfMany | Abs |
| Round | Sign |
| Round decimal precision | Int |
| Round Closest to Increment | Fix |
| Round Up to Increment | Log10 |
| Round Down to Increment | Ln |
| Ceil | Pow |
| Floor | Min |
| Sin | Max |
| Cos | CDbl |
| Tan | EqualWithinTolerance |
iLogic Math functions
iLogic provides some Math functions. The following functions emulate the functions available in standard Inventor parameter equations:
Ceil (same as Math.Ceiling)
Sign0(a) = 1 if a > 0.0, = 0 otherwise
Ln (same as Math.Log)
Because certain Autodesk Inventor functions differ from the VB.NET standard Math functions of the same name, they are converted when captured for use in an iLogic rule:
- The function
sign
becomessign0
in the rule. - The function
log
becomeslog10
in the rule.
Trigonometric functions
| Sin(0) = 0 | Cos(PI) = -1 |
| Sin(PI) = 0 | Tan(0) = 0 |
| Sin(PI/2) = 1 | Tan(PI/4) = 1 |
| Cos(0) = 1 | PI = 3.1415926...... |
| Cos(PI/2) = 0 |
Sin()
,Cos()
, andTan()
are standard trigonometric functions with arguments expressed in radians (not degrees):If you use the Capture Current State option on a trigonometric formula in the Edit Rule dialog box, it is not be converted to VB.NET code. Instead, the formula is left as an Inventor formula. You can edit the formula manually to change it into a VB.NET formula (with angles in radian units).
To convert from degrees to radians, use the following formula:
radians = degrees *(PI/180)
Other Math functions
| Function | Purpose | Examples |
| Abs() | Return the absolute value of the argument. |
Abs(10) = 10
Abs(-9.87) = 9.87 |
| Sqrt() | Return the square root of the argument. |
Sqrt(25) = 5
Sqrt(100) = 10
Sqrt(3) = 1.732051 |
| Sign() | Return a number indicating the sign of the argument. | If the value is positive, Sign(value) = 1 If the value is negative, Sign(value) = -1 If the value is zero, Sign(value) = 0 |
| Round() | Round the argument to a whole number (integer), or to a specified number of decimal places. | Syntax: Round(argument, optional # of decimal places desired)
Round(2.55689) = 3
Round(2.55689, 1) = 2.6
Round(2.55689, 3) = 2.557
Round(PI, 4) = 3.1416 |
| Ceil() | Round the argument to the next higher integer. |
Ceil(2.56) = 3
Ceil(Sqrt(3))= 2 |
| Floor() | Round the argument to the next lower integer. |
Floor(1.789) = 1
Floor(PI) = 3 |
| Log10() | Return the base 10 logarithm of the argument. |
Log10(10) = 1
Log10(100) = 2
Log10(15) = 1.176091 |
| Ln() | Return the natural logarithm of the argument. (base e logarithm). |
Ln(5) = 1.609438
Ln(37) = 3.610918 |
| Pow(argument1, argument2) | Return the result of raising argument1 to the exponent of argument2. | Pow(2, 2) = 22 = 4 Pow(2, 3) = 23 = 8 Pow(3, 2) = 32 = 9 |
Comparison functions
| Function | Purpose | Examples |
| Min(argument1, argument2) | Return the lesser of the two arguments. |
Min(2, 4) = 2
Min(9, 4) = 4
Min(Sqrt(2), Sqrt(3)) = 1.4142..... |
| Max(argument1,argument2) | Return the greater of the two arguments. |
Max(2, 4) = 4
Max(9, 4) = 9
Sqrt(3)) = 1.73205..... |
| MinOfMany( ,,, ) | Return the lesser of many arguments. |
MinOfMany(2,4,3,6,7,8) = 2
MinOfMany(9,4,5,67,3,5) = 3
MinOfMany(Sqrt(2), Sqrt(3), Sin(PI/2)) = 1 |
| MaxOfMany( ,,, ) | Return the largest of many arguments. |
MaxOfMany(2,4,3,6,7,8) = 8
MaxOfMany(9,4,5,67,3,5) = 67
MaxOfMany(Sqrt(2), Sqrt(3), Sin(PI/ignored>/2)) = 1.73205..... |
| EqualWithinTolerance(a, b, 0.001) | Compares the values of two parameters (represented by a and b) and compares the difference to the tolerance value (specified here as 0.001). If the difference is less than the tolerance, the function returns the Boolean value True. If the difference is greater than the tolerance, the function returns the Boolean value False. |
If a = 10.00 and b=10.01
EqualWithinTolerance(a, b, 0.015) = True[Abs(a-b) is less than the tolerance value of 0.015 in]
EqualWithinTolerance(a, b, 0.001) = False[Abs(a-b) is greater than the tolerance value of 0.001] |
| EqualWithinTolerance(a,b) | Use a default tolerance of 0.0000001 |
String functions
iLogic provides a set of String functions for text parameters that can be included in your iLogic rules. To access the String functions, expand the Strings node under the System tab in the Snippets area.
Standard String functions
Most of the String functions used in iLogic are provided as part of the standard VB.NET String Library. They include:
| Left() | CStr() |
| Compare | Now() |
| Len() | DateString |
| Right() | TimeString |
| Mid() | Val(string) |
| LCase() | Read All Text |
| UCase() |
Note: DateString will only show the date in the format mm/dd/yy, for a format native to your machine, use:
DateTime.Now.ToString("d")
Documentation for these functions is available at http://msdn.microsoft.com/en-us/library/system.string_methods(VS.80).aspx.
iLogic String functions
Several String functions are specific to iLogic:
| Function | Purpose | Examples |
| CDblAny(string) | Convert a text string into a Double value. Like the standard VB.NET function CDbl. It converts a text string using either a comma or a period as a decimal separator, independent of your Windows language settings. It can fail if the text string does not represent a valid number. |
x = CDblAny("3.14159") returns 3.14159
x = CDblAny("3,14159") returns 3.14159 |
| RoundToFraction(value, fractionFactor, RoundingMethod.Round) | Format a numeric value as a text string, in fraction form to represent inch measurements. Returns a fraction (for example, "1/2"), or a number and fraction (for example, "3 5/8"). Rounds the value to a multiple of the fraction factor. fractionFactor must be 1/2, 1/4, 1/8, 1/16, 1/32, 1/64, or 1/128. RoundingMethod.Round rounds to the closest multiple of fractionFactor. |
RoundToFraction(0.7502, 1/4, RoundingMethod.Round)' returns "1/4" |
| RoundToFraction(value, fractionFactor, RoundingMethod.RoundUp) | Format a numeric value as a text string, in fraction form to represent inch measurements. Returns a fraction (for example, "1/2") or a number and fraction (for example, "3 5/8"). Rounds the value to a multiple of the fraction factor. fractionFactor must be 1/2, 1/4, 1/8, 1/16, 1/32, 1/64, or 1/128. RoundingMethod.RoundUp rounds to the nearest multiple of fractionFactor, greater than or equal to the value. |
RoundToFraction(0.7502, 1/4, RoundingMethod.RoundUp)' returns "3/4"
RoundToFraction(0.749, 1/4, RoundingMethod.RoundUp) ' returns "3/4"
RoundToFraction(0.749, 1/8, RoundingMethod.RoundUp)' returns "3/4"
RoundToFraction(0.7, 1/8, RoundingMethod.RoundUp) ' returns "3/4"
RoundToFraction(0.6, 1/4, RoundingMethod.RoundUp)' returns "3/4"
RoundToFraction(0.6, 1/8, RoundingMethod.RoundUp) ' returns "5/8" |
| RoundToFraction(value, fractionFactor, RoundingMethod.RoundDown) | Format a numeric value as a text string, in fraction form to represent inch measurements. Returns a fraction (for example, "1/2") or a number and fraction (for example, "3 5/8"). Rounds the value to a multiple of the fraction factor. fractionFactor must be 1/2, 1/4, 1/8, 1/16, 1/32, 1/64, or 1/128. RoundingMethod.RoundDown rounds to the nearest multiple of fractionFactor, less than or equal to the value. |
RoundToFraction(0.7502, 1/4, RoundingMethod.RoundDown) ' returns "3/4"
RoundToFraction(0.749, 1/4, RoundingMethod.RoundDown) ' returns "1/2" |
| FormatAsFraction(value, [numberOfDecimals]) | Format a numeric value as a text string, in fraction form to represent inch measurements. Returns a fraction (for example, "1/2"), or number and fraction (for example, "3 5/8"). Only if the value can be expressed as a whole-number fraction with a power-of-2 denominator (up to a maximum of 128, within 0.0000001). Otherwise it returns a decimal number. If decimals are returned, the numberofDecimals argument affects the rounding of the resulting text string. This argument is optional, and defaults to 3 if it is not provided. |
FormatAsFraction(0.75) ' returns "3/4"
FormatAsFraction(2.375)' returns "2 3/8"
FormatAsFraction(2.4) ' returns "2.4"
FormatAsFraction(2.00001) ' returns "2" |
Note: You can use the
CDblAny
function to convert values of iLogic text parameters to numbers.
Variables functions
To access the Variables functions, expand the Variables node under the System tab in the Snippets area.
Shared Variable functions
iLogic shared variables are shared between rules and stored in memory. Unlike Inventor parameters, they are not associated with any part or assembly. You can use shared variables instead of Inventor parameters to pass data between rules. You can also use them to store data that cannot be stored in Inventor parameters. The following examples demonstrate their use:
SharedVariable("Thread1") = "1/4-20 UNC"
Assigns a text value to a shared variable called
Thread1
. If the variable does not exist, it is created.s0 = SharedVariable("Thread1")
Assigns the value of a shared variable to a text parameter. The variable type is known because you created it previously.
SharedVariable("Distance1") = 7.2
Assigns a number to a shared variable.
d0 = SharedVariable("Distance1")
Assigns the value of a shared variable to a numeric parameter.
if SharedVariable.Exists("Thread1") then
Tests whether a parameter exists. If the parameter was created in another rule, this function returns True.
SharedVariable.Remove("Thread1")
Removes (deletes) a shared variable. Although not required, this function is recommended if you know you no longer need the variable.
SharedVariable.RemoveAll()
Removes all shared variables. Use this function with care in a rule. If any unrelated parts and assemblies are open that use shared variables, use the Free iLogic Memory command instead.
New Array functions
The New Array functions are standard Visual Basic functions you can use to define different types of arrays and set initial values. For more information on these functions, refer to the Visual Basic help.
New Double Array
Defines a new Double type array and sets initial values.
MyDoubleValues = new double(){1.2,2.2,3.3}
New Integer Array
Defines a new Integer type array and sets initial values.
MyIntegerValues = new integer(){1,2,3}
New String Array
Defines a new String type array and sets initial values.
MyStringValues = new string(){string1,string2}
New Object Array
Defines a new Object type array and sets initial values.
MyObjectValues = new object(){"string",true,1.234}
New Array List
Defines a new ArrayList type variable and add some values to it.
Dim MyArrayList As New ArrayList
MyArrayList.add("string")
MyArrayList.add(1.234)
MyArrayList.add(True)
For Each Loop
Loops through the values in an Array or ArrayList variable.
for each oval in MyVariableHere
msgbox(oval)
next
Material Properties functions
To access the Material Properties functions, expand the Material Properties node under the System tab in the Snippets area.
Refer to the Inventor API help for more information on these functions.
Sheet Metal functions
Use Sheet Metal functions to set and/or read the current Sheet Metal Rule and KFactor in a sheet metal part. These functions allow you to change the current Sheet Metal Rule automatically, based on certain conditions such as the current material or material thickness.
To access the Sheet Metal functions, expand the Sheet Metal node under the System tab in the Snippets area.
SheetMetal.SetActiveStyle
Sets the current active Sheet Metal Rule. This function is equivalent to manually selecting a Sheet Metal Rule from the Sheet Metal Defaults dialog box.
Syntax
SheetMetal.SetActiveStyle("styleName")
"styleName"
Name of the Sheet Metal Rule from the Sheet Metal Defaults dialog box. The name is not case sensitive.
Examples
SheetMetal.SetActiveStyle("styleName")
Specifies the name of a style from the Sheet Metal Rule list:
SheetMetal.SetActiveStyle(MyStyleParameter)
Specifies an iLogic text parameter.
SheetMetal.GetActiveStyle
Reads the currently active Sheet Metal Rule. You can assign it to an iLogic text parameter or to a local variable in a rule. Use this function to act on a model or change the model based on the active Sheet Metal Rule.
Example
CurrentStyleParameter=SheetMetal.GetActiveStyle()
SheetMetal.ActiveKFactor
Reads the currently active KFactor (a numeric value).
Examples
KFactorParameter=SheetMetal.ActiveKFactor
Flat Pattern Extents functions
Use these functions to get the extents of the unfolded flat pattern. You can also view these values by right-clicking on the Flat Pattern in the model tree for the sheet metal part, and selecting Extents.
SheetMetal.FlatExtentsLength
Gets the width (X dimension) of the flat pattern extents.
SheetMetal.FlatExtentsWidth
Gets the width (Y dimension) of the flat pattern extents.
SheetMetal.FlatExtentsArea
Gets the area (X * Y) of the flat pattern extents.
Drawing functions
Use Drawing functions to customize the way that changes to the model are reflected in the drawing sheets. Drawing functions can facilitate efficient model updates, and they can be included in rules triggered by the iLogic Drawing View Change event.
ThisDrawing
Accesses the current drawing in a rule.
ActiveSheet
Accesses the active sheet in a drawing. This function is an alias for
ThisDrawing.ActiveSheet
. Most drawing operations are performed on the active sheet, because the other sheets may not be up-to-date.ThisDrawing.Sheet
Accesses a sheet in the drawing.
Syntax
ThisDrawing.Sheet("sheetname")
ResourceFileName
You can assign a filename string to this property to specify the name of another drawing from which to pull title block and border definitions. When you use the
TitleBlock
orBorder
Sheet function, iLogic looks in this drawing for resources that are not found in the current drawing. Use a relative path name for this file name. iLogic searches for this file in the folder of the current drawing and in the project workspace folder. You can specify subfolders relative to either of these locations.Example
ThisDrawing.ResourceFileName = "DrawingResources1.idw"
KeepExtraResources
Set this property to
False
if copies of the resources from the external resource file are not kept in the current drawing.If you set this property to
False
, a resource is deleted when another resource replaces it. Deletion only happens if theResourceFileName
is not blank. It is assumed that all the resources you need can be found in the external resource file.Example
ThisDrawing.KeepExtraResources = False
Sheet functions
Sheet functions for drawings usually operate on the active sheet. To restrict a rule so that it only runs for a particular sheet, you can add code at the top of a rule. For example:
If (ActiveSheet.Name <> "Sheet:2") Then Return
ChangeSize (using text string value)
Changes the size of the sheet, using a text string as the value of the new size.
Syntax
Sheet.ChangeSize ("value",
value
The value of the new size.
MoveBorderItems
This parameter is optional. If
MoveBorderItems
is set toFalse
, any tables and parts lists currently located on the border or edge of the sheet are not moved to the new border.Examples
ActiveSheet.ChangeSize ("A")
ActiveSheet.ChangeSize ("B1", MoveBorderItems := False)
ChangeSize (using custom values)
Changes the size of the sheet, using a custom height and width, in document units.
Syntax
Sheet.ChangeSize (customHeight, customWidth,
height
The height in document units.
width
The width in document units.
MoveBorderItems
This parameter is optional. If
MoveBorderItems
is set toFalse
, any tables and parts lists currently located on the border or edge of the sheet are not moved to the new border.Examples
ActiveSheet.ChangeSize (7.2, 4)
ActiveSheet.ChangeSize ( 7.2, 4, MoveBorderItems = False)
Sheet.Border
Change the current border on the sheet by specifying a different name. The name must be found in the drawing resources of the current drawing, or in the ResourceFileName drawing if it is specified.
Examples
ActiveSheet.Border = "OtherBorder"
currentName = ActiveSheet.Border
Sheet.TitleBlock
Change the current title block on the sheet by specifying a different name. The name must be found in the drawing resources of the current drawing, or in the ResourceFileName drawing if it is specified..
Examples
ActiveSheet.TitleBlock = "ANSI - A"
currentName = ActiveSheet.TitleBlock
Example when using an external source file -
ThisDrawing.ResourceFileName = "DrawingResources1.idw"
ActiveSheet.TitleBlock = "Custom - A"
ActiveSheet.Name
Gets the name of the sheet.
ActiveSheet.Size
Gets the size of the sheet as a text string, such as "A" or "B0".
ActiveSheet.Height
Gets the height of the sheet, in document units.
ActiveSheet.Width
Gets the width of the sheet, in document units.
ActiveSheet.View("viewName")
Gets access to a view on the sheet.
View functions
View functions for drawings usually operate on active sheet (recommended).
View.Name
Gets the name of the view.
View.Height
Gets the height of the view, in drawing document units.
View.Width
Gets the width of the view, in drawing document units.
View.Scale
Gets or sets the view scale as a number.
View.ScaleString
Gets or sets the view scale as a text string, such as "1:2" or "4.1".
View.SetCenter(centerX,centerY)
Sets the center point of the view (moves the view). Coordinates are specified in drawing document units.
View.SetSpacingToCorner(distanceX, distanceY, corner)
Sets the view position (moves the view) by specifying the distance from a view corner to the nearest sheet corner. The variable
corner
can be one of the following:SheetCorner.BottomLeft
SheetCorner.BottomRight
SheetCorner.TopLeft
SheetCorner.TopRight
Coordinates are specified in drawing units. iLogic finds the corner that is closest to a sheet corner.
View.SpacingBetween("otherViewName")
Sets the view position (moves the view) by specifying the space between this view and another view. The other view name is typically an adjacent view on the sheet. The spacing is between view edges, in the X or Y direction. Specify a positive spacing value to place this view to the right or above the other view. Specify a negative value to place this view to the left or below the other view. For example:
ActiveSheet.View("VIEW2").SpacingBetween("VIEW1") = 30 mm '
VIEW2
is to the right ofVIEW1
.ActiveSheet.View("VIEW3").SpacingBetween("VIEW1") = -40 mm '
VIEW3
is belowVIEW1
.View.Balloons
Accesses the balloons in the view.
Balloon functions
Balloon functions for drawings are tied to a particular view.
Balloons.Reattach
For views of assembly documents, this function checks for unattached balloons in the view and attaches them to a component, if possible. The first choice is a component at the arrowhead location. If none is found, the closest eligible component without a balloon is used. If the balloon cannot be attached at this time, it is moved to a hidden layer. The hidden layer is a layer created (if necessary) for this purpose.
Note: This function requires that the Preserve Orphaned Annotations option is set for the drawing (under Tools  Options
  Document Settings). If this option is not set, the function sets it automatically.
Balloons.AttachToComponent("componentName")
Specifies a component that requires a balloon. The
componentName
specifies a component occurrence, such as"Pin:1"
. When you use this function, balloons are only reattached to the components that you specify. If you do not use this function, balloons are reattached to any available component (unless disqualified by theDoNotAttachToComponent
function).Balloons.DoNotAttachToComponent("componentName")
Specifies a component that does not require a balloon. The
componentName
specifies a component occurrence, such as"Pin:1".
Advanced Drawing API functions
Use the Advanced Drawing API functions if you want to take advantage of API functions. Note the following interface types for objects used in the Drawing functions:
-
ThisDrawing
is of the typeICadDrawing
. -
Sheet
is of the typeICadSheet
. -
View
is of the typeICadView
.
ThisDrawing.Document
Accesses the underlying drawing document. Returns an object of type
Inventor.DrawingDocument.
ICadSheet.Sheet
Accesses the underlying sheet. Returns an object of type
Inventor.Sheet
.ICadView.View
Accesses the underlying view object. Returns an object of type
Inventor.DrawingView
.ICadView.ModelDocument
Accesses the document shown in this view. Returns an object of type
Inventor.Document
. Returns Nothing if the document is not a model view.
Advanced API functions
ThisApplication
The Inventor application object for the current session of Autodesk Inventor. From this object, you can directly access the Inventor API. For Help on the API, refer to the Programming Help, which is under Additional Resources on the Help Menu.
This object is also accessible using the older syntax:
app = InventorVb.Application
ThisDoc.Document
Gets the document in which the current rule is stored, as an
Inventor.Document
object. It can provide a starting point from which to examine or modify the model. This object is described in the Inventor API help.Syntax
doc = ThisDoc.Document
This object is also accessible with the older syntax:
doc = iLogicVb.RuleDocument
ModelDocument
Gets the model document (part or assembly) that is shown in a drawing document. If no model document exists, this function returns Nothing. If more than one model document exists, it returns the first one found.
Syntax
doc = ThisDoc.ModelDocument
Automation
Accesses the iLogicAutomation object in a rule.
Syntax
auto = iLogicVb.Automation
UserInterfaceManager
Required in a rule before using certain Inventor API functions such as Document.SelectSet.Select. If you encounter a VBA sample or other API code that does not work within a rule, add this statement at the top of the rule.
Syntax
ThisApplication.UserInterfaceManager.UserInteractionDisabled = False
InventorComponent
Use this function to get direct access to a component. It returns an object of the type Inventor.ComponentOccurrence.
Syntax
compo = Component.InventorComponent("componentName")
InventorFeature
Gets direct access to a feature. This function returns an object of the type Inventor.PartFeature.
Syntax
feat = Feature.InventorFeature("featureName")
InventorFeature (component)
Gets direct access to a feature in a component or document.
Syntax
feat = Feature.InventorFeature(componentOrDocNameName, "featureName")