Alignment, orientation, and rotation of drawing views
Most dependent views are created with an alignment to the parent view, and inherit the view orientation. If appropriate, you can change the alignment or orientation of views placed in the drawing.
There are four possible alignment relationships between a dependent view and its parent view:
Vertical alignment
Vertically aligned views share the same x value at their origin. A vertically aligned view can be moved only along the Y axis of its parent view.
Horizontal alignment
Horizontally aligned views share the same y value at their origin. A horizontally aligned view can be moved only along the x axis of its parent view.
In Position alignment
Positionally aligned views are aligned to an axis or edge that is not horizontal or vertical. For example, a projected isometric view may have a positional alignment to its parent view. If its parent view is moved, the positionally aligned view moves to maintain its angle from the x axis of the parent view. You can create a positional alignment between any two views on a drawing.
 Horizontal, Vertical, or In Position. Then select the view to align to. When a view is aligned, you must break the existing alignment before you create a new alignment.
 Break alignment
Unaligned views have no constraints to another view. An unaligned view can be moved freely on the drawing sheet and does not automatically move if the parent view is moved.
 Break. Then select the view to make independent. Alternatively, double-click the dependent view to open the Drawing View dialog box. Then clear the Align from Base check box on the Display Options tab.
 When you create a base view, you set the orientation of the model in the Drawing View dialog box. You can select an option from the Orientation list or create a view with a custom orientation.
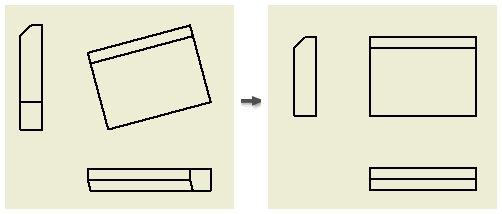
By default, a parent view and its child views keep the same orientation. When you rotate a parent view, you can either maintain or break alignment of dependent view(s). When you rotate a child view, the child view orientation becomes independent on the parent view.
Alignment is a constraint relationship between two drawing views. Most dependent views are created with an alignment, but you can add, change, or remove alignment relationships.
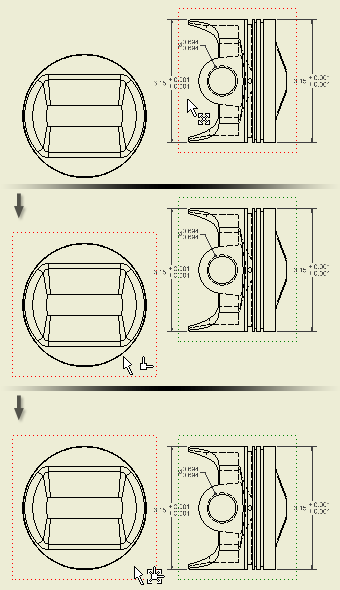
Add an alignment between views
- Select the view to align.
- Right-click, and then select Alignment from the menu.
- Select the alignment relationship from the list.
- Click the parent view for the alignment. The view to be aligned moves into alignment with the parent view.
- Select the view from which to remove the alignment.
- Right-click, and then select Alignment from the menu.
- Select Break to remove the alignment.
Customize orientation of a drawing view
If the needed view orientation is not included in the Orientation list, you can set up a custom drawing view. Click Change View Orientation in the Drawing View dialog box and specify a custom orientation in the Custom View window.
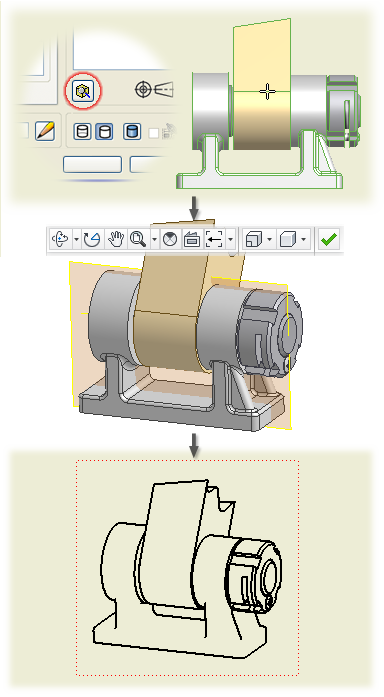
- Open the Drawing View dialog box:
- To create a view, click

 on the ribbon.
Then select a model file in the Drawing View dialog box.
- To change orientation of an existing view, double-click the view.
- To create a view, click
- Click Change View Orientation in the Drawing View dialog box.

- Use commands on the Custom View tab of the ribbon to set up the view orientation. For example:
 Click
Click 

 on the ribbon.
 Then use options in the Incremental View Rotate dialog box to set the model orientation.
 Click
Click 
 to rotate a model face to the projection plane.
  Click
Click 
 to rotate the model to the perspective position.
- Click

 to accept the view orientation and close the Custom View window.
 - Click OK to close the Drawing View dialog box.
 Show Me how to change view orientation
 Show Me how to align a child view orientation with a base view
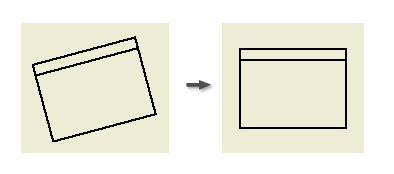
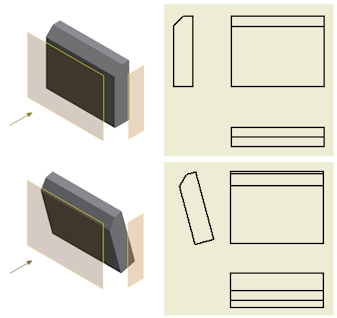
To rotate a drawing view, you select a model edge and then rotate the edge by a specified angle, or to vertical or horizontal position. You cannot rotate a view that has a dependent section or auxiliary view.
- Right-click a view to rotate and select Rotate from the menu. The Rotate View dialog box displays.
- To rotate the view by edge:
- Select Edge from the Rotate View By list.
- Select an edge in the drawing view.
- Select Horizontal to make the selected edge horizontal, or select Vertical to make the selected edge vertical.
- To rotate the view by angle:
- Select Absolute Angle or Relative Angle from the Rotate View By list.
- Enter the angle you want to rotate the selected view through.
- Select the direction in which you want to rotate the view.
- Specify whether to rotate the dependent views:
- Select Rotate View to rotate only the selected view. Child views keep the original orientation.
- Select Rotate Camera to propagate the rotation to all dependent views.
- Click OK to close the dialog box. If appropriate, click OK in the message box that informs you about rotation of dependent views.
By default, a parent view and its child views keep the same orientation. When you rotate a parent view, you can either maintain or break alignment of dependent view(s). When you rotate a child view, the child view orientation becomes independent on the parent view.
 Show Me how to rotate drawing views
 Show Me how to create a constrained sketch and rotate a view with sketch
- On the ribbon, click

 to create an auxiliary view.
 - Right-click the auxiliary view and select Realign auxiliary views from the context menu.
- Select a model edge from the parent view. and place a new auxiliary view.
- Move the preview to the appropriate location, and then click to place the view. As you move the preview, the orientation of the projected view changes to reflect its relationship to the parent view.
- To finish, click in the graphics window.
The old view is updated to the new location and orientation.
Rotates the orientation of an existing drawing view.
| Access: | Select the view, right-click, and then select Rotate from the menu. |
Determines the method you use to rotate views. Select a method from the list. | |
Edge | Select an edge and then select Horizontal or Vertical. |
Absolute Angle | Rotates the view at the specified angle with respect to the sheet’s coordinate system. Enter an angle to the edit box. |
Relative Angle | Rotates the view at the specified angle with respect to the current orientation of the view. Enter an angle to the edit box. |
Determines the direction in which you rotate the view. | |
Counter clockwise | Rotates the selected view in the counter clockwise direction. |
Clockwise | Rotates the selected view in the clockwise direction. |
Rotates a drawing view or presentation view in a specified direction by a specified angle.
 When developing an assembly presentation view, click