Centerlines and center marks
After you place a drawing view or create a sketch, you can add centerlines and center marks using one of two methods:
- Automated centerlines use predefined criteria to add centerlines and center marks to the selected drawing view or sketch.
- Manual centerlines add centerlines and center marks to selected features individually.

You can add automated centerlines and center marks to circles, arcs, ellipses, and patterns, including models with holes and extruded cuts (except mid-plane extrusions). iFeatures and iParts can also have automated centerlines and center marks.
When you set up a drawing, use options in Document Settings to define the default criteria for adding automated centerlines to drawing views. To make automated centerline criteria available to all new drawings, set them in the drawing templates.
The settings include types of features to receive centerlines and center marks and if the geometry is normal or parallel projection. You can set thresholds to exclude circular features smaller or larger than the specified radius and smaller than a minimum angle.
After adding a view to a drawing, you can add automated centerlines using the default criteria. If needed, you can change the settings for one or more selected views at a time.
The format of a centerline or center mark is specified in the Center Mark Style. When settings are saved in a style library, the style is applied to all drawings that use the library.

You can manually apply four types of centerlines and center marks to individual features or parts in a drawing view.
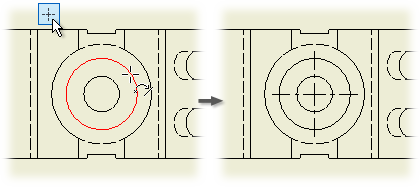
- Center Mark to annotate the center of holes, circular edges, and cylindrical geometry
- Centerline to annotate the center of holes, circular edges, and cylindrical geometry
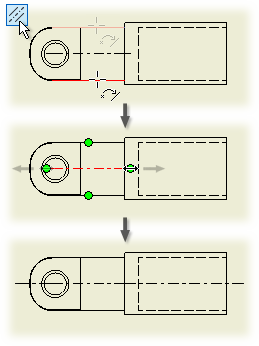
- Centerline Bisector to create a centerline that bisects two lines
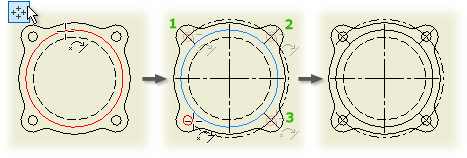
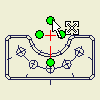
- Centered Pattern to create a centerline on designs that have a consistent feature pattern
Modifying centerlines and center marks
Whether you place automated or manual centerlines, they can be modified in some ways.
- Change the layer style.
- Change the center mark style.
- Hide or display extension lines.
- Turn off visibility of selected center marks and centerlines.
- Align a center mark to an edge.
- Fit a center mark to a feature.
- Add or remove dashes in an extension line.
- Set uniform dashing on an extension line.
You can calculate the center of gravity of a model for every view. In the browser, select the top level of the model, right-click and select Center of Gravity. The command calculates the center of gravity of the model and produces a center mark on the drawing view at the relative position of the center of gravity.
Center of gravity calculation does not refer to the physical property values of the component. When you change the relevant model, the center of gravity position on the drawing view updates.
Only one center of gravity representation is displayed for one view except for overlay views. They can display one center of gravity per overlaid positional representation as well as the base representation.
The center of gravity is not supported for draft views and views of presentation files.
For cut operations, such as detail views and crop views, the center of gravity calculation is performed on the original component, not the cropped or detail model.
The center of gravity position on the drawing view is calculated for the model referenced in the drawing view. The center of gravity calculation takes into account the following items:
Positional representation referenced in a view. Design View representations and Level of detail representations do not affect center of gravity. The center of gravity only refers to the Master level of detail representation of the assembly. The suppression or substitution of the model does not affect the location of the center of gravity.
Weldment state (preparation, weldment, machining view). Component-isolated preparation views cannot have the center of gravity displayed.
iPart or iAssembly member view.
Sheet metal flat pattern versus folded model.
The center mark is formatted by a center mark style in the Style and Standard Editor.
You cannot use the drag method to move the center of gravity center mark.
Setting style for centerlines and center marks
Use the default style associated with the active standard or modify the mark, gap, extension, and other attributes in the style before you place centerlines and center marks in a drawing. The active center mark style controls the appearance for both automated and manual center marks and centerlines. Changes to the style are in effect only for the current document unless you save changes to the style library. The style defaults are available to all documents using the active standard.
You can edit the center mark style in the Style and Standard Editor to change mark, gap, extension, and other attributes. If the line type for center marks and centerlines is set to continuous, all center mark style attributes are applied on center marks and centerlines in the drawing.
You can change the line type of center marks and centerlines in the Layers section of Style and Standard Editor. The appearance of center marks and centerlines in the drawing is then changed to respect the selected line type.
Tips for working with automated centerlines and center marks
When working with centerlines and center marks, consider the following:
- Dependent views inherit the centerline settings from the base view. You can change the settings for a dependent view after placing it.
- If you reapply automated centerlines after deleting individual centerlines or center marks, the deleted centerlines or center marks are reapplied as well.
- If you reapply automated centerlines after deleting individual centerlines or center marks, hidden centerlines or center marks are not reapplied.
- When features share a common center, automated centerlines places only one centerline or center mark.
- If a centerline for a pattern overlaps another centerline for the same pattern, you can choose which centerline to keep, or delete them both and manually create one that incorporates both.
- Automated centerlines are not applied to features for which the visibility is turned off in the model or view.
- If you create a pattern in a sketch that is consumed by a feature (for example, the sketch is extruded), only center marks are created.
- When you change or add features to the model, reapply automated centerlines or manually place them on the new feature.
- When applying centerlines and center marks to a pattern, each element is marked, including the centerlines and center marks of nested patterns.
Add centerlines and center marks

You can add automated centerlines and center marks to a drawing view or manually add several types of centerlines and center marks.
Add automated centerlines to a drawing view
You can add automated centerlines and center marks to circles, arcs, ellipses, patterns, and sheet metal punches.
- Select one or more drawing views or sketches using Shift+Select or CTRL+Select, right-click, and select Automated Centerlines.
- In the Centerline Settings dialog box, select the features to receive centerlines.
- Set Normal or Parallel projection.
- Set limits of features to mark with automated centerlines:
- In the Radius Threshold box, enter minimum and maximum radii to exclude elements not included in the range.
- In the Arc Angle Threshold box, enter the angle minimum to exclude elements with a smaller angle.

Manually add a centerline bisector

Manually add a centered pattern

Create a closed circular centerline for a centered pattern, for example, by clicking the center hole, and then clicking each hole in the circle in sequence, going clockwise or counterclockwise.
Edit centerlines and center marks
 | You can edit centerlines and center marks, turn visibility on and off, and customize the appearance of extension lines. |
Drag the endpoint of an extension line for a centerline or center mark to lengthen or shorten it.
Hide or show centerlines or center marks
- Select unwanted centerlines and center marks.
- Right-click and select Visibility.
- Clear the check mark to turn off visibility of selected centerlines or center marks.
To restore visibility of hidden centerlines or center marks:
- Click the view that contains hidden centerlines and center marks.
- Right-click and select Annotation Visibility.
- Click Show Hidden Annotations.
Visible centerlines and center marks are dimmed and cannot be selected.
- Right-click a center mark, and select Edit
 Extension Lines.
 - Select the check mark to display extension lines or clear the check mark to hide them.
Align a center mark to an edge
- Right-click a center mark, and select Edit
 Align to Edge.
 - In the graphics window, click the edge to align the center mark.
Fit a center mark to a feature
Right-click a center mark, and select Edit Fit Center Mark to fit the extension line display within its associated feature. If the active style specifies that the extension line overshoots the feature, the extension line extends beyond the edges of the feature by the specified distance.
Add or remove dashes in an extension line
- Right-click an extension line and select Edit
 Add/Remove Dashes.
 - In the graphics window, click the extension line at each dash location. If no dash exists, one is created. If you click an existing dash, it is removed.
- Continue to select extension lines as desired.
- Right-click, and then select Done Add/Remove Dashes to end the operation.
Set uniform dashing in extension lines
Select Uniform Dashing before adding or removing dashes to keep spacing uniform.
- Right-click a center mark, and select Edit
 Uniform Dashing.
 - To uniformly space unevenly spaced dashes, select Uniform Dashing.
- To enable variable spacing or to move existing dashes to varying distances, clear the check mark.
Change style for centerlines and center marks
The active center mark style controls the appearance for both automated and manual center marks and centerlines. Changes to the style are in effect only for the current document unless you save changes to the style library. The style defaults are available to all documents using the active standard.
- Right-click a center mark or centerline, and select Edit Center Mark Style.
- In the Style and Standard Editor change mark, gap, extension, and other attributes. If the line type for center marks and centerlines is set to continuous, all center mark style attributes are applied in the drawing.
- To change the line type for center marks or centerlines, expand the Layers section in Style and Standard Editor, and click the Center Marks or Centerlines item. Select the desired line type in the Layer Styles table, then click Save and Done. The appearance of center marks and centerlines in the drawing is changed to respect the selected line type.
Sets the defaults for adding automated centerlines and center marks to drawing views or changes the centerline and center mark settings for the selected view. Defaults are used when a view is created.
Access: | When setting up a drawing or template, Click To add automated centerlines to a view, select the view, right-click, and then select Automated Centerlines. |
Apply To | Selects the features to which automated centerlines are applied. Features can include holes, fillets, cylindrical features (including the arc of punch features), revolutions, bends, and sheet metal punches. If the features are used in a pattern and a patterned centerline is used, use the Rectangular Patterned or Circular Patterned Features option. To add center marks to a sketch, use the Sketch Geometry option. |
Projection | Sets the projection of objects in view for which automated centerlines or center marks are applied. Axis Normal creates center marks when the circular edge is normal to the view plane. Axis Parallel creates centerlines when the circular edge is parallel to the view plane. |
Work Features | Only visible user-defined work features in the top-level model are recovered. To recover additional work features, use Include Work Features to recover work features in the view, or Include to recover a specific work feature. |
Radius Threshold | Sets the limits for automated centerlines on fillet, arc, and circular features. Centerlines are not added to features that fall outside the specified threshold. Fillet sets threshold for applying automated centerlines to fillet features. Enter the minimum and maximum radii. Circular Edges sets the threshold for applying automated centerlines to arcs and circular features. Enter the minimum and maximum radii. Precision sets the rounding precision for comparing the size of fillets, arcs, and circular features to the threshold. Click the arrow, and then select the precision. |
Arc Angle Threshold | Angle Minimum sets the minimum angle for creating a center mark or centerline on circles, arcs, or ellipses. |
 Show Me how to use a Center of Gravity marker on a drawing view


