Sheet metal annotations in drawings
 | You can create sheet metal annotations in flat pattern views of sheet metal parts. The following types of annotations are available in the drawing:
|
Bend Notes, Bend Tables, and Bend Tags
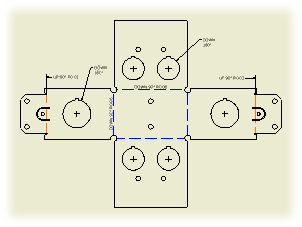
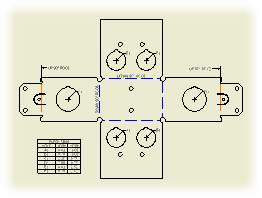
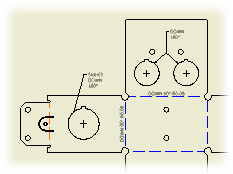
A bend note adds fabricating information to sheet metal bend, contour roll, and cosmetic centerlines. To add a bend note, click the Bend command and select a bend, roll or cosmetic centerline in the drawing view. Bend notes are associated with a drawing view.
Click ![]()
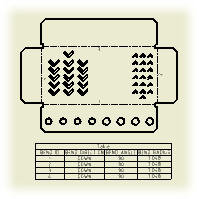
![]() to create a bend table. Select a sheet metal part as the source file, or a drawing view of the sheet metal part (and the corresponding source file is selected automatically). If the selected source file includes several sources for table data, select the appropriate source from a list.
to create a bend table. Select a sheet metal part as the source file, or a drawing view of the sheet metal part (and the corresponding source file is selected automatically). If the selected source file includes several sources for table data, select the appropriate source from a list.
Bend tags associate rows in a bend table with the view geometry. Bend tags are formatted by the Dimension style, and do not have a leader by default. Drag the bend tag text away from the original position to add a leader to the bend tag.
If you select a drawing view to specify the source of table data, bend tags are added to the selected drawing view automatically after the bend table is inserted in the drawing. To add bend tags in a drawing view manually, right-click the bend table and select Add Tags to View. Then select the drawing view.
- Each individual bend centerline is treated as an individual bend object in the drawing (with respect to both bend notes and bend tables). In the sheet metal model, the number of bend centerlines is not equal to individual bend features. (The contour flange, contour roll, lofted flange, and hem features produce multiple bend centerlines in one operation).
- Contour Roll and Cosmetic centerline features are automatically collected into any generated bend table.
- Contour roll centerlines do not report KFactor or direction information (in bend tables or notes).
- Bend centerlines, Contour roll centerlines, and general drawing centerlines added to a drawing view are all unique object types and are mapped to separate layers. You can optionally wish to edit the default attributes for these objects (using the Style and Standard Editor) to allow for visual differentiation within your drawings. Refer to Styles in drawings for additional details.
- Depending on the attributes applied during creation, Cosmetic centerlines can produce empty fields or custom formatting of text strings in bend tables or notes.
- If it is necessary to change the Bend ID sequence: open the sheet metal part, edit the flat pattern and make the required changes using the Bend Order functionality.
- If the Bend Order sequence has been modified, the resulting sequence of Bend IDs within any bend table can require sorting using the Table Edit functionality.
- If you select a drawing view while creating a bend table, the bend direction in the table corresponds with the direction of bends in the view. If you select a sheet metal part file as the source for a bend table, the default bend direction is displayed in the bend table. To revert the bend direction, edit the bend table, right-click the Bend Direction column, and select Reverse Direction.
- To correct the bend direction in legacy drawings, drag the bend note or table to a new position.
- Bend tables are not associated with a drawing view. The bend table is not deleted if you delete the drawing view selected on creating the bend table.
- If the selected sheet metal file does not contain a flat pattern or contains a flat pattern created in Inventor 2010 or earlier using the DataM unfolder, the file is not recognized as a valid table data source.
- Bend Tables for sheet metal materials provide values for the bend allowance at specific bend radii and bend angles for a given material thickness, and have no relation to Bend Tables in drawings.
Punch Notes, Punch Center Recovery, and Punch Tables
The appearance of punch features in the drawing view corresponds with the representation selected in the model. If punch features are fully formed in the model, visible and hidden model edges are displayed in the drawing view.
Click ![]()
![]() to create a punch note. Then select a punch feature in the drawing and place the note.
to create a punch note. Then select a punch feature in the drawing and place the note.
A punch note includes data related to the punch, for example the punch ID, angle, direction, depth, quantity note, and so on. The default style of punch notes is set on the Notes and Leaders tab of the Dimension Style panel.
Before you create a punch table, recover punch centers. Punch centers are represented by center marks in a drawing view.
If you create a view-based hole table and select to include recovered punch centers, all visible punch center marks are included in the hole table as individual rows. The corresponding tags are created in the drawing view.
On the Annotate tab, Feature Notes panel, use Hole Table to create a punch table. If needed, change Default Filters in Hole Table Style to include recovered punch centers in the hole table by default.
- Punch Direction in punch notes and tables is determined by the drawing view. If Punch Direction is DOWN for a punch in a punch note or table related to a front view, it is UP for the same punch in a back view.
- To correct the punch direction in a legacy punch table, drag the punch table to a new position.
- The appearance of punch features in the drawing view corresponds with the representation selected in the model. That means, if punch features are fully formed in the model, visible and hidden model edges are displayed in the drawing view. You can choose to include punch center marks in the Drawing View dialog box, but you cannot display the 2D representation of punch features in the drawing view.
- Punch centers cannot be individually unloaded from the drawing view. The only way to remove a recovered punch center is to edit the view and cancel the selection of the Recover Punch Centers option. Any annotations attached to punch center marks are deleted.
- Set the visibility of punch centers by using the Visibility option in the right-click menu. To display hidden punch center select Show Hidden Annotations in the right-click menu of the drawing view.
- Center marks associated with punch centers cannot be moved or rotated, but the center mark extensions can be independently resized by dragging.
- When flat pattern drawing views display punch centers, center marks are added, moved, and deleted to reflect any change in the source sheet metal file.
- Unconsumed punch centers in the punch feature sketch are not displayed as recovered punch centers.
- The default formatting for recovered punch centers is specified by the active style. To edit the punch centers style, open the Object Defaults Style panel and change the setting for Visible Simplified Representation and Hidden Simplified Representation.
Dual dimensions in bend and punch annotations
Bend and punch notes can display dimension values in alternate units. Set the dual units display on the Alternate Units tab of the Dimension Style.
To display dual dimension values in a bend or punch table, add the alternate unit columns to the table by using the Column Chooser dialog box.
- On the ribbon, click

 .
. - On the drawing sheet, select a view of a sheet metal part.Note If you select a drawing view while creating a bend table, the bend direction in the table corresponds with the direction of bends in the view. If you select a sheet metal part file as the source for a bend table, the default bend direction is displayed in the bend table. To revert the bend direction, edit the bend table, right-click the Bend Direction column, and select Reverse Direction.
- Click OK to place the table on the drawing sheet. The table is placed with a default title of: TABLE. Columns for: BEND ID, BEND DIRECTION, BEND ANGLE, and BEND RADIUS are included by default.
Optionally, following step 2, you can:
- Select the Column Chooser in the Rows and Columns area of the Table dialog box. Add or remove columns from the bend table you are about to produce.
- Select the Alpha Bend ID Format radio control in the Bend ID area of the Rows and Columns area of the Table dialog box. Report the Bend ID using an alphabetic sequence identifier. By default, the bend table is produced using a numeric bend sequence identifier.
- Enter a character string in the Prefix field in the Bend ID area of the Rows and Columns area of the Table dialog box. Include the entered string in front of the alpha or numeric Bend ID in the resulting table.
Bend tags associate rows in a bend table with the view geometry.
If you select a drawing view while creating a bend table, bend tags are added to the selected drawing view automatically after the bend table is inserted in the drawing.
To add bend tags in a drawing view manually:
- Right-click the bend table.
- Select Add Tags to View from the menu.
- Select the drawing view to place bend tags.
- Right-click a bend table, and select Edit from the menu.
- Make the desired edits in the Edit Table dialog box:
- Click Renumber to renumber items in the table consecutively according to the current order. The initial numbering rules for the bend table are respected.
- Right-click the Bend Direction column and select Reverse Direction to revert the direction for bends in the table.
- For more procedures, see the Edit a table page in Help.
- Click Apply to save changes, and OK to close the Edit Table dialog box.
A bend note adds fabricating information to sheet metal bend centerlines. Bend notes are associated with a drawing view. Each individual bend centerline is treated as an individual bend object in the drawing (with respect to both bend notes and bend tables).
- Right-click a bend note, and select Edit Bend Note from the menu.
- In the Edit Bend Note dialog box, edit the bend note text in the edit field:
- Click Bend Direction, Bend Angle, Bend Radius, or kFactor in the Values and Symbols section to insert the corresponding property in the edit field.
- Click the arrow next to the Insert Symbol command to select and insert a symbol.
- If appropriate, add a stacked text in the note. Type a correct stacking sequence, select it, right-click and choose Stack. If AutoStacking is enabled, fractional numbers with a valid stacking trigger followed by a neutral character are stacked automatically as you type.
- To change the precision of the Bend Angle, Bend Radius, and kFactor value, click Precision and Tolerance. Then change Precision and Tolerances in the Precision and Tolerance dialog box:
- To set precision, select Use Global Precision to use precision setting defined on the Units tab of the active Dimension style. Or, cancel the selection of Use Global Precision, and select the Precision for Bend Angle, Bend Radius, and kFactor.
- To set tolerances for Bend Angle and Bend Radius, click the More option, select the check box in the Tolerances section. Then select Method, enter the tolerance values, and select the precision.
- Select Part Units to use the measurement units of the model. Clear the check mark to use the measurement units specified by the Dimension style.
- Click OK to close the Edit Bend Note dialog box.
- To change position of the note along the bend centerline, click the note text and drag it along the bend centerline to the appropriate position.
- To create a leader, click the note text and drag it to an appropriate position away from the bend centerline.
- To create a linear extension leader, click the note text and drag it behind the endpoint of the associative bend centerline.
- To flip the bend note, click the note text and drag it in a perpendicular direction towards the bend centerline.
Display or hide alternate unit dimensions
Bend notes can display dimension values both in primary and in alternate measurement units. Edit the Dimension Style to change the settings.
The Dimension style controls the default style of bend notes.
- On the ribbon, click

 .
. - In the Style and Standard Editor dialog box, expand the Dimension item, and click a dimension style.
- On the Notes and Leaders tab, select Bend Note Settings.
- If needed, edit the default bend note text in the edit field: Click Bend Direction, Bend Angle, Bend Radius, or kFactor in the Values and Symbols section to insert the corresponding property in the edit field. Click the arrow next to the Insert Symbol command to select and insert a symbol.
- To change the precision of the Bend Angle, Bend Radius, and kFactor value, click Precision and Tolerance. Then change Precision and Tolerances in the Precision and Tolerance dialog box:
- To set precision, select Use Global Precision to use precision setting defined on the Units tab of the active Dimension style, or unselect Use Global Precision, and select the desired Precision for Bend Angle, Bend Radius, and kFactor.
- To set tolerances for Bend Angle and Bend Radius, click the More option, select the check box in the Tolerances section. Then select Method, enter the tolerance values, and select the precision.
- If needed, open the Display tab, and change the Origin Offset value.
- Click Save and Done to save the changes and close the Style Editor.
- Recover punch centers in the base view: click

 . In the Drawing View dialog box, select a sheet metal component as File. Select Flat Pattern view and Recover Punch Center in the Sheet Metal View section.
 - Create center marks for punch features to include in the punch table. To add center marks automatically, right-click the view, and select Automated Centerlines. To add center marks manually, click

 and select particular punch features.
 - To create a punch table for a drawing view, click

 . Select the drawing view, click a point to place the origin indicator, and then click to place the punch table.
 - If the punch features are not included in the hole table by default, right-click the hole table and select Edit Hole Table. On the Options tab of the Edit Hole Table dialog box, select the Recovered Punch Centers option in the Included Features section.
- To add the appropriate columns to the punch table, right-click the hole table and select Edit Hole Table. On the Formatting tab of the Edit Hole Table dialog box, click Column Chooser, and add the punch-specific columns to the Selected Properties list.
- Right-click a punch note, and select Edit Punch Note from the menu.
- In the Edit Punch Note dialog box, edit the punch note text in the edit field:
- Click Punch ID, Punch Direction, Punch Angle, or Punch Depth in the Values and Symbols section to insert the corresponding property in the edit field.
- Click Quantity Note to insert the Quantity Note property in the edit field.
- Click the arrow next to the Insert Symbol command to select and insert a symbol.
- If appropriate, add a stacked text in the note. Type a correct stacking sequence, select it, right-click and choose Stack. If AutoStacking is enabled, fractional numbers with a valid stacking trigger followed by a neutral character are stacked automatically as you type.
- To change the precision and tolerance of the Punch Angle and Punch Depth value, click Precision and Tolerance. Then change the setting in the Precision and Tolerance dialog box:
- To set precision, select Use Global Precision to use precision setting defined on the Units tab of the active Dimension style. Or cancel the selection of Use Global Precision, and select the Precision for Punch Angle and Punch Depth.
- To set tolerances for Punch Angle and Punch Depth, click the More option. Then select the check box in the Punch Angle and Punch Depth row, select Method, enter the values and select the precision.
- Select Part Units to use the measurement units of the model. Remove the check mark to use the measurement units specified by the Dimension style.
- Click OK to close the Edit Punch Note dialog box.
Display or hide alternate unit dimensions
Punch notes can display dimension values both in primary and in alternate measurement units. Edit the Dimension Style to change the settings.
- On the ribbon, click

 .
. - In the Styles and Standard Editor dialog box, expand the Dimension item, and click a dimension style.
- On the Notes and Leaders tab, select Punch Note Settings.
- If appropriate, edit the default punch note text in the edit field: Click Punch ID, Punch Direction, Punch Angle, or Punch Depth in the Values and Symbols section to insert the corresponding property in the edit field. Click the arrow next to the Insert Symbol command to select and insert a symbol.
- To change the precision of the Punch Angle and Punch Depth value, click Precision and Tolerance. Then change Precision and Tolerances in the Precision and Tolerance dialog box:
- To set precision, select Use Global Precision to use precision setting defined on the Units tab of the active Dimension style, or unselect Use Global Precision, and select the desired Precision for Punch Angle and Punch Depth.
- To set tolerances for Punch Angle and Punch Depth, click the More option. Then select the check box in the Punch Angle and Punch Depth row, select Method, enter the values and select the precision.
- Click Save and Done to save the changes and close the Style Editor.
Use the Edit Punch Note dialog box to edit the punch note text, to change precision, tolerance, and units of the displayed punch parameters, or to edit quantity note.
Access: | Right-click a punch note, and select Edit Punch Note from the menu. |
Edit Field | Edits the punch note text. Edit the text manually, or in Values and Symbols, click a value or symbol to add a punch parameter or symbol.. |
| | Inserts the Punch ID parameter in the text field. |
| | Inserts the Punch Direction parameter in the text field. |
| | Inserts the Punch Angle parameter in the text field. |
| | Inserts the Punch Depth parameter in the text field. |
| | Inserts the Quantity Note property in the text field. |
| | Selects a symbol from the list to add it to the punch note. |
| | Opens the Sheet metal annotations in drawings dialog box so you can add tolerance information to values included in notes. |
| | Opens the Sheet metal annotations in drawings dialog box so you can change the display of the quantity note property. |
Part Units | Check the box to use model units. Remove the check mark to use the measurement units specified by Dimension Style. |
Sets the precision and tolerance attributes for punch notes.
Use the Quantity Note dialog box to change the display of the quantity note property in punch notes. Quantity Note is not displayed if the Punch Note is used in the context of a Punch Table or if the quantity is less than 2.
Icon pending
Use the Edit Bend Note dialog box to edit the bend note text, or to change precision, tolerance and units of the displayed bend parameters.
Access: | Right-click a bend note, and select Edit Bend Note from the menu. |
Text field | Edits the bend note text. Edit the text manually, or in Values and Symbols, click a value or symbol to add a bend parameter or symbol. |
| | Inserts the Bend Direction parameter in the text field. |
| | Inserts the Bend Angle parameter in the text field. |
| | Inserts the Bend Radius parameter in the text field. |
| | Inserts the kFactor parameter in the text field. |
| | Selects a symbol from the list to add to the bend note. |
Precision/Tolerance Settings | Opens the Precision and Tolerance dialog box so you can add tolerance information to values included in notes. |
Part Units | Check the box to use model units. Remove the check mark to use the measurement units specified by the Dimension style. |
For a selected drawing view of an iPart, iAssembly or presentation of an iAssembly, creates a table that references a Table style for formatting. During creation or table placement, the referenced table style can be changed by selecting a different table style from the style list on the Annotate tab.
Columns and Rows | Available when creating a general table. Default is four columns and ten rows, except if the active Table style has the number of columns defined in the Default Column Settings. In that case, the default number of columns is as specified in the style. The number of columns and rows can be edited as desired. |
Column Chooser | Available when the selected file is an iPart or iAssembly. In the Table Column Chooser, selects columns to include in the table. Includes columns designated when the table was defined. For more information, see Table Column Chooser. |
Selected Columns | Shows columns to include in the table when placed. Columns set as keys in the iPart or iAssembly are displayed by default. Click OK and click to place the table on the drawing sheet. Like parts lists, the upper left corner of the table is constrained to selected view geometry or the border or title block. |
Modifies formatting and options of a hole table. Overrides settings specified by the hole table style for the current document.
Access: | Right-click a hole table and select Edit Hole Table. |
Changes values for row merging, hole tags, tag order, and view filters in the current hole table.
Row Merge Options modifies settings for merging hole table rows.


